Go through the tutorial steps for installing the popular PHP framework Laravel on Amazon Linux 2023 for developing your web applications using the AWS cloud environment.
Amazon Linux is the official Linux server distribution provided by AWS on its cloud computing environments to use RPM-based packages. It is a stable alternative to RHEL and other similar Linux systems with long-term support. Amazon Linux 2023 is the successor and upgraded version of Amazon Linux 2 which is based on Fedora. Whereas, Laravel is a popular PHP web application framework known for its elegant syntax and powerful features.
In this guide, we discuss the steps required to perform for installing Laravel on Amazon Linux, enabling you to develop and deploy web applications with ease.
Prerequisites:
Before you begin, ensure you have the following:
- An Amazon Linux instance with SSH access.
- Basic knowledge of Linux commands
- Familiarity with PHP and web development concepts.
Step 1: Update Amazon Linux 2023 Packages:
Access your Amazon Linux 2023 Instance either using SSH remotely or directly from the AWS Dashboard. After that, first, run the system update command once you have its command terminal access.
sudo dnf updateStep 2: Install LAMP Stack:
Although we can use the PHP Artisan webserver to just test our Laravel web applications, if you are planning to use it later commercially, then it is a good idea to start with full-fledged web servers like Apache. Hence, here we are installing a complete web server environment using the LAMP stack.
sudo dnf install httpd mariadb*-server php php-mysqlndStep 3: Start and enable the Apache and MariaDB services:
Once the installation of the web server, MariaDB, and PHP is completed, start and enable the required services, here are the commands to do that:
sudo systemctl enable --now httpd
sudo systemctl enable --now mariadb
Step 4: Create Database
Once done create a Database for Laravel:
Log in to the Database, if you are not already:
sudo mysqlNow, use the given commands, one by one:
CREATE DATABASE yourdb;CREATE USER 'youruser'@'localhost' IDENTIFIED BY 'password';GRANT ALL ON yourdb.* to 'youruser'@'localhost';FLUSH PRIVILEGES;quit;Note: Replace yourdb with whatever name you want to give your Database, whereas youruser is the user you want to create while the password is the secret key to protect your created user account.
Step 5: Install PHP Composer for Laravel on Amazon Linux 2023
To install Laravel and the dependencies required by it to work properly, we need to use Composer. It is a library manager for PHP projects. Well, Composer is not available using the default package manager of Amazon Linux 2023. Therefore, here we are going for an installer script, officially provided by the developers of this PHP library management tool.
curl -sS https://getcomposer.org/installer | phpsudo mv composer.phar /usr/local/bin/composersudo chmod +x /usr/local/bin/composerStep 6: Download the Laravel framework project
Let’s clone Laravel from its GitHub repository directly into our web root directory.
Switch to the web directory:
cd /var/wwwClone Laravel
sudo dnf install git -ysudo git clone https://github.com/laravel/laravel.gitStep 7: Install Laravel on Amazon Linux 2023
Once you have downloaded Laravel on your system, switch to its directory and use the Composer to start the installation process.
cd /var/www/laravelGive permission to your current to access the Laravel folder, so that we can run the composer command later without sudo.
sudo chown -R $USER /var/www/laravelUse the Composer
composer installOnce the installation is completed the change permission to files
sudo chown -R apache.apache /var/www/laravelsudo chmod -R 755 /var/www/laravelsudo chmod -R 777 /var/www/laravel/storageStep 8. Create the Laravel environment configuration file
We already have an example environment file, let’s use it to create one for our Laravel app.
While inside the Laravel directory, run:
sudo cp .env.example .envGenerate an encryption key for your app:
sudo php artisan key:generateAdd the Database details:
sudo nano .envGo to the database section and change the values:
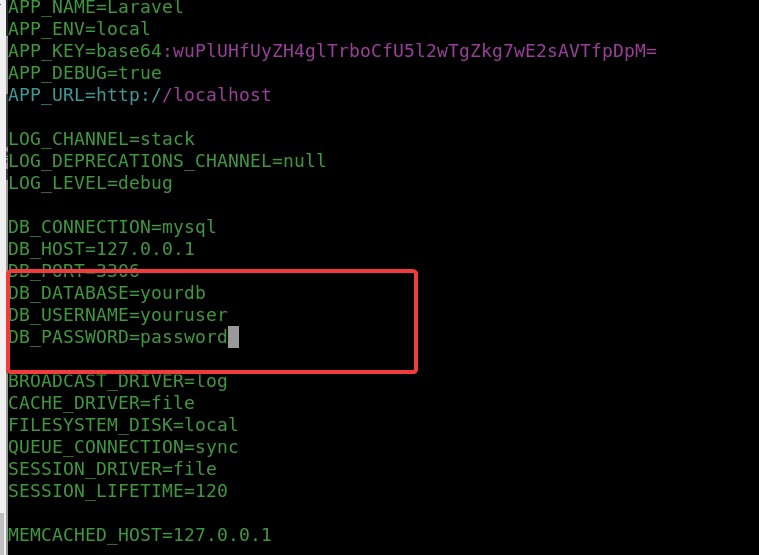
Save the file using Ctrl+O, hit the Enter key, and then exit the file using Ctrl+X.
Step 9: Apache Configuration for PHP Laravel App
Create an Apache configuration file that will point the server to serve the files provided by Laravel instead of the default Apache page.
sudo nano /etc/httpd/conf.d/laravel.confAdd the following lines:
<VirtualHost *:80>
       ServerName laravel.example.com
       DocumentRoot /var/www/laravel/public

       <Directory /var/www/laravel>
              AllowOverride All
       </Directory>
</VirtualHost>
Note: You can change laravel.example.com with your domain, if you want to use that for accessing your Laravel project, however, the DNS A or CNAME record must be pointed to your Amazon server’s address or else leave it as it is.
Save the file and restart the Apache.
sudo systemctl restart httpdStep 10: Get the Laravel demo page
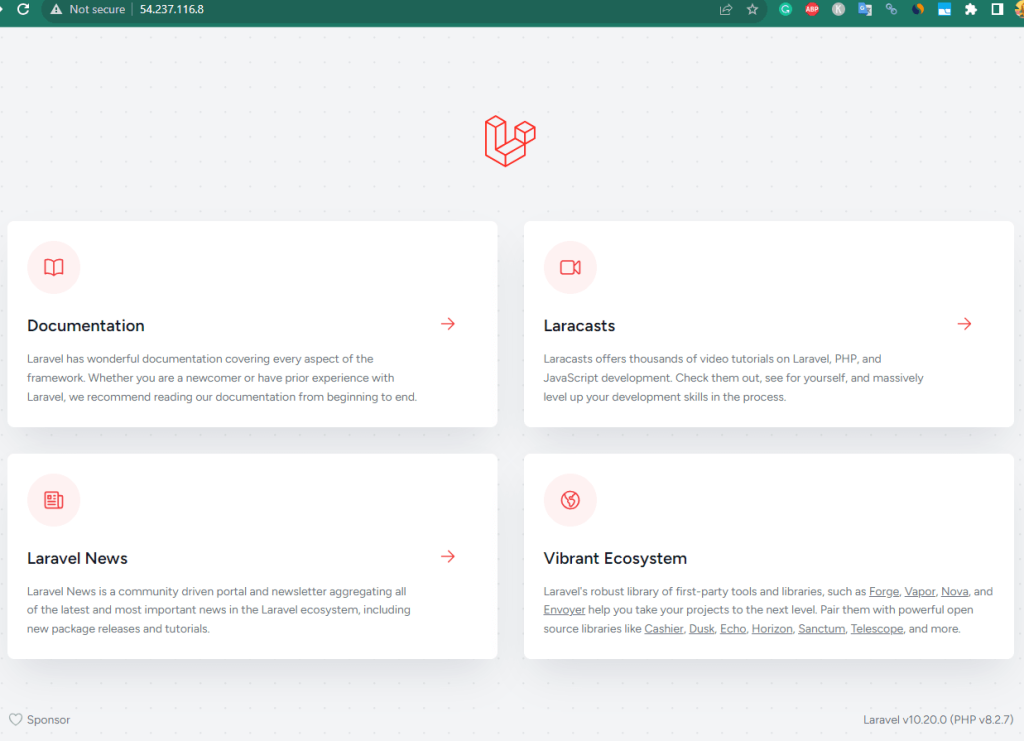
We have configured the Laravel PHP framework to access through the Apache web server over port 80. Hence, simply open your system’s browser that can access the IP address of Amazon Linux 2023 where you have installed Laravel, and point it to it.
Other Articles: