Steps and commands to install and configure Memcached on Ubuntu 22.04 LTS Jammy JellyFish to cache data for PHP or Python-based applications.
Memcached is a BSD-licensed published cache server used by many organizations and website owners to quickly retrieve data from memory. It has been used by many users to improve the overall speed and performance of their dynamic websites with database connectivity to improve performance by avoiding disk access and storing important data in memory or by minimizing the call of complex and frequently used database queries – especially SELECT statements.
Data is provided with a unique key value and stored as strings in memory whereas the connection takes place to the Memcached server via the PROTOCOLS TCP and IP. The stored data can be either permanent or temporary. Well, in the case of temporary storage, the deletion of cached data will happen automatically after the configured interval of time.
Steps to install Memcached Server on Ubuntu 22.04 LTS
Estimated reading time: 7 minutes
1. Update Ubuntu 22.04
Access the terminal of your Ubuntu 22.04 LTS server and run the given command to install the latest updates available for the system.
sudo apt update
2. APT to Install Memcached on Ubuntu 22.04
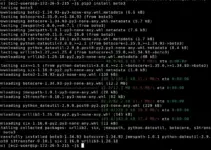
We don’t need to add any third-party repository to install Memcached Server on Ubuntu 22.04 because it is already available through the system’s default Repo. Hence, we can use the APT package manager with the package names available to configure this cache server on our system.
Note: The second package we have installed using the below-given command i.e libmemcached-tools provides a command line utility to manage the cache server using the terminal of Ubuntu.
sudo apt install memcached libmemcached-tools
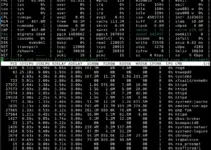
3. Check Service and version on Ubuntu 22.04
Now, let’s check which version of the Memcached server is on our system. Will also learn here the command to check the status of the MemCached service.
memcached -V
For service status:
systemctl status memcached -V
The above command will tell us whether the service of our cache server is running actively or not; including which IP address can access it at what port number.

4. To enable Memcached for PHP applications
If you want to use Memcached on Ubuntu 22.04 for PHP-based applications such as WordPress, Magento, and others, then we have to install an extension called php-memcached. It can easily be installed using the APT package manager. Here is the command:
sudo apt install php-memcached
Note: The above command must run on the Ubuntu or Debian server where you are hosting your PHP application. And we are also assuming that you already have PHP installed. If you don’t have PHP then run this command:
sudo apt install apache2 php libapache2-mod-php php-memcached php-cli
5. Check Memcached is working for PHP
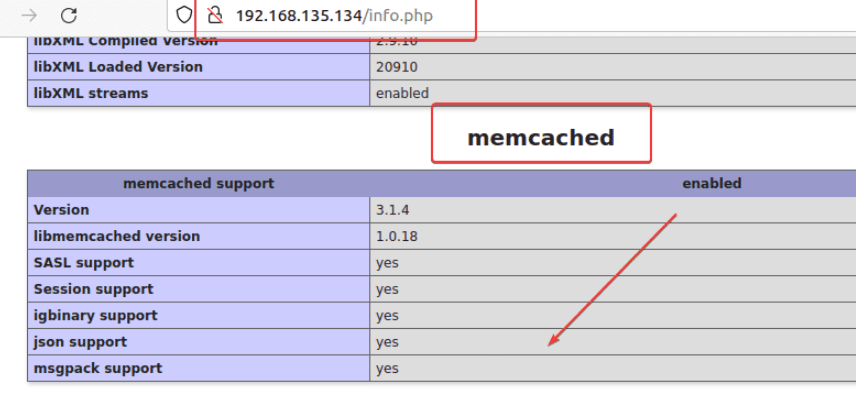
To confirm our installation of Memcached on Ubuntu 22.04 and its extension is working for the PHP applications, we can create info.php file on the server where Apache and PHP are installed.
sudo nano /var/www/html/php.info
Paste this code:
<?php
// Show all information, defaults to INFO_ALL
phpinfo();
Save the file using Ctrl+O, hit the Enter key, and then exit the text editor using Ctrl+X.
After that open your browser and point to the created file: http://server-ip-address/info.php
Scroll down and you will find a section showing details related to Memcached. This means the extension is enabled and working for PHP.
6. Confirm whether Memcached is caching or not
Now, let’s confirm further whether this caching server is storing our data temporarily in the memory to speed up the performance of our PHP applications or not. For that create a Test.php file.
sudo nano /var/www/html/test.php
Copy-Paste the following in the file
<?php

try

{
$memcached = new Memcached();
$memcached->addServer("127.0.0.1", 11211);
$response = $memcached->get("key_cache");

if($response==true)
{
echo "Result coming from caching";
echo $response;
}

else

{
echo "Cache is not created yet, reload again to see changes";
$memcached->set("key_cache", "Hooray! Memcache is working now ...") ;
}
}
catch (exception $e)
{
echo $e->getMessage();
}
?>
Save the file using Ctrl+O, hit the Enter key, and then exit the text editor using Ctrl+X.
Now, open your browser and point to your created Test.php file:
http://your-server-ip-address/test.php
You will see the output showing “Cache is not created yet, reload again to see changes...” Reload the Test.php page.

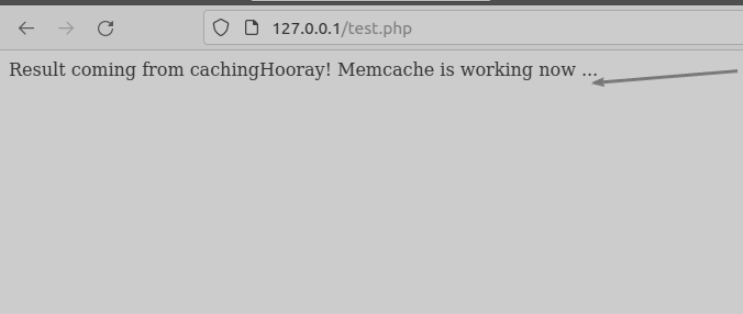
If the cache server is working fine then you will see the following output:
“Result coming from caching. Hooray! Memcache is working now…’
7. For Remote Server
Well, by default the Memcached server on Ubuntu 22.04 listens to localhost only which means if both Memcached and the application such as WordPress are installed on the same server then this setting is absolutely fine. However, if your PHP or Python application is installed on some remote server that wants to use the Memcached service installed on some other system then we have to configure it for that.
Simply, edit the configuration file of your cache server, here is the command for that:
sudo nano /etc/memcached.conf
Scroll down and find a line -l 127.0.0.1 and replace the 127.0.0.1 with the IP address of the remote server where your application is running that need a caching service.

For example, if the IP is 192.168.135.134 then it looks like this way: -l 192.168.135.134
Save the file using – Ctrl+O, press Enter key, and exit- Ctrl+X,
Also, don’t forget to allow TCP port 11211 in your VPS or cloud hosting firewall. If you are using Ubuntu’s UFW firewall then you have to open the port in that for remote connection; use the given command:
sudo ufw allow 11211/tcp
8. Enable Memcached of Python Apps (optional)
Those who are using Python-based web applications and want to use Memcached for them can install the required library using the PIP package manager of Python.
pip install pymemcache
pip install python-memcached
9. Memcached Command line
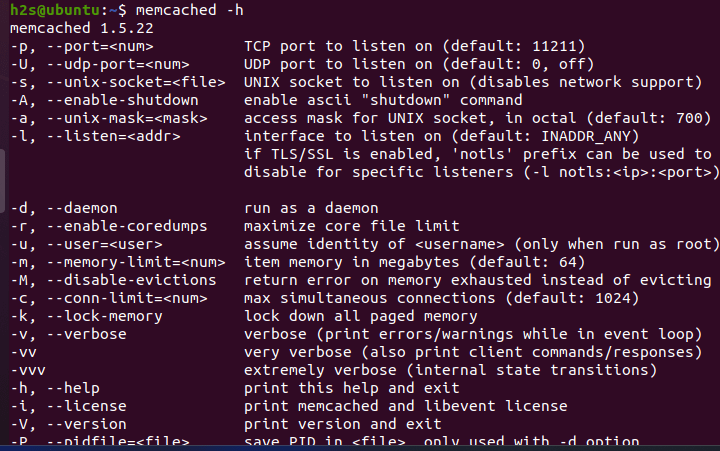
To use the command line for configuring Memcached, use its command line. For that simply type:
memcached –option
To know what Options are available to use, see its help section:
memcached -h
10. Uninstall Memcached on Ubuntu 22.04
Those who want to remove this cache server completely from their Ubuntu 22.04 system for any reason can use the given command:
sudo apt autoremove --purge memcached libmemcached-tools
FAQ
Memcached is an open-source distributed memory-caching system used to increase the performance of web applications by storing data from the database in RAM. It can be used for caching sessions, web pages, API, query results, and other objects such as images, files, and metadata.
Memcached is a free and open-source caching server and hence absolutely free to use for personal and commercial purposes without paying any charges.
Yes, Memcached is a NoSQL data management solution because it uses a key-value data model. It uses the RAM to store data and increase the performance of data transfer when called by the user in a web application for example a WordPress-based website.
Yes, we can use Memcached on Docker. Simply use the pre-built image of this caching system available in the Docker library to create a container and then point to your server that needs its caching service.
Other Articles:
⇒ Install PostgreSQL 13 on Ubuntu 22.04 LTS Linux
⇒ Install Python 3.9 or 3.8 on Ubuntu 22.04 LTS Jammy JellyFish
⇒ 2 ways to Install Cassandra on Ubuntu 22.04 LTS Jammy
⇒ Install PrestaShop on Ubuntu 22.04 Server
⇒ How to install Linux kernel 5.19 on Ubuntu 22.04 or 20.04