The PHP-Zip module or extension is required for PHP-based web applications that deal in ZIP archives and files within the app. If you’re working on a web project that involves the compression and decompression of files, you have to install the PHP-Zip module otherwise your application will not work properly.
Although installing the PHP-ZIP extension is quite easy and usually available through the default system repository of Linux, however, it is not the case with Amazon Linux 2023. And that’s why we need to write this tutorial for those who are facing problems in getting a ZIP extension.
Prerequisites
Nothing much just access to an Amazon Linux 2023 instance with administrative privileges.
Step 1: SSH into Your Amazon Linux Instance
Open your terminal and establish an SSH connection to your Amazon Linux instance or connect to it directly from your AWS Ec2 or Lightsail Instance dashboard.
Step 2: Run DNF Update
Although it is not necessary, if you have not updated your system for a while then run the given command. It will refresh the package manager cache as well.
sudo dnf updateStep 3: Install the PHP dev package and other dependencies
As we don’t have a PHP-zip extension to install directly from the system repository of Amazon Linux 2023 while writing this article, we will install it using PECL, which is a repository for PHP Extensions. And for that, we need the packages given in the following command:
sudo dnf install php-devel php-pear libzip libzip-develStep 4: Install PHP-ZIP on Amazon Linux 2023
Once you are done and got the PECL using the previous command of this tutorial, we can use it for installing the ZIP extension of PHP. On your terminal run:
sudo pecl install zipStep 5: Enable php-zip extension
The module will be installed under /usr/lib64/php8.2/modules. Note: replace php8.2 with the version you currently have on your system of PHP, if you want to check. Now, to enable it, create an INI file for the module, here is the command to do that:
echo "extension=zip.so" | sudo tee /etc/php.d/20-zip.iniStep 6: Restart Apache and PHP-FPM
To apply the changes you have made and make the ZIP extension discoverable by your web application, restart the HTTPD and PHP-FPM services on your Amazon Linux:
sudo systemctl restart httpdsudo systemctl restart php-fpmStep 7: Verify the Installation
There are multiple ways to verify the extension we have installed is enabled to use for PHP-based applications or not, here are a few:
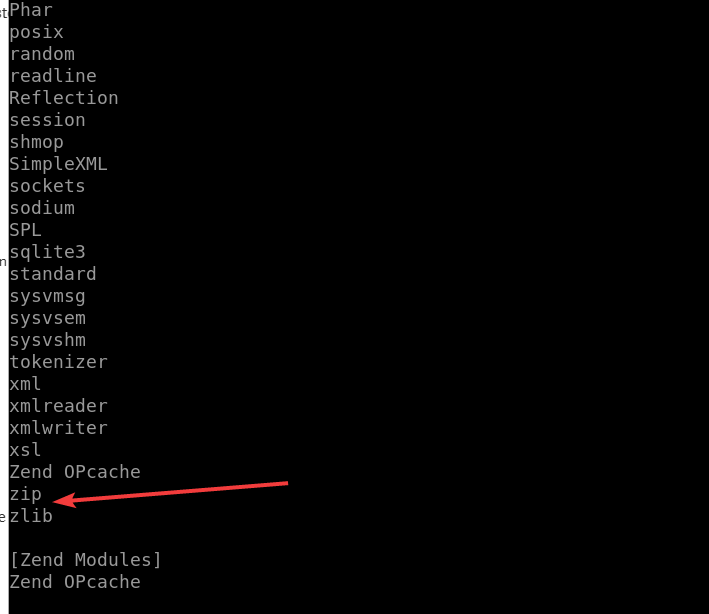
Method 1# Using PHP command:
php -mYou will see the list of PHP extensions installed on your system
Method 2# Using a simple PHP script
Create a new PHP file using a text editor. For example:
nano test_zip.phpAdd the following code to the test_zip.php file:
<?php
if (extension_loaded('zip')) {
echo "PHP-Zip module is installed and enabled.\n";
} else {
echo "PHP-Zip module is not installed.\n";
}
?>
Save the file by pressing Ctrl+X, type Y and hit Enter to exit the text editor.
Run the PHP script using the following command:
php test_zip.phpIf the PHP-Zip module is installed and enabled, you will see the message: “PHP-Zip module is installed and enabled.”

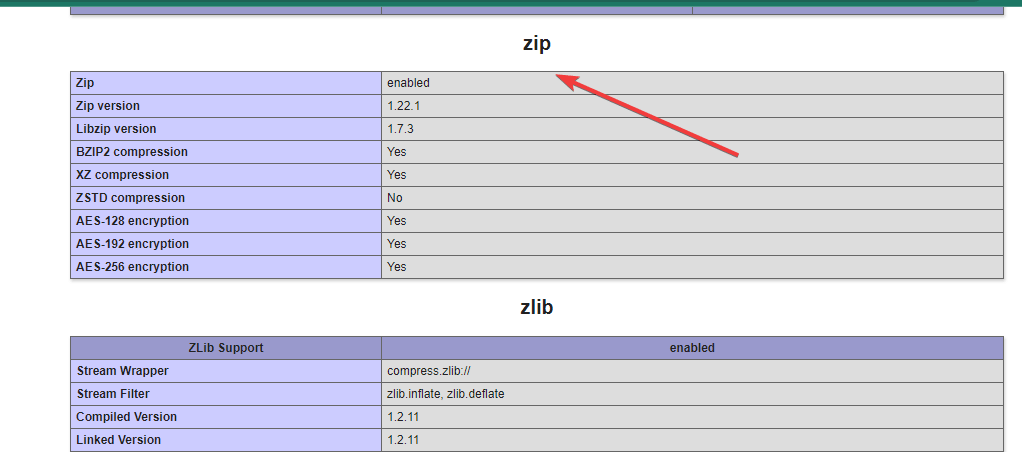
Method 3#: Using phpinfo() file:
sudo suecho "<?php phpinfo(); ?>" > /var/www/html/phpinfo.phpOn your browser, use your server ip-address or domain name and point it to the created file:
http://your-server-ip-address/phpinfo.phpYou will have complete information about your installed PHP along with all extensions:
Note: In case even after installing and enabling the PHP ZIP extension on Amazon Linux 2023, your web application is not detecting it then restart the server once using – sudo reboot


Well done, THANKS!