Install Code-Server on Almalinux 8 or Rocky Linux 8 server to run VS Code using a Web browser with the help of a command terminal and script.
Microsoft Visual Studio Code is a free editor for various different but popular programming languages. Code-Server is an open-source platform that includes VS Code to run with a server-side process in the browser. This platform uses a web server that can be started from any location and then accessed via a browser. The editor then works on the server-side file system. Microsoft doesn’t allow access to its own marketplace, although most of the extensions found there is open source therefore, the user can install them directly from the web interface of Code-Server, further, installation of extensions is also possible by directly importing the VSIX package.
To start working with Code Server- we just only need to start its instances installed either on the cloud, desktop, laptop, server, container, or virtual machine. Network access to it is of course also necessary.
Steps to install VS Code-Server on Almalinux 8 or Rocky Linux 8
The commands given here can be used on other Redhat-based Linux systems such as CentOS, and Oracle Linux… running locally or on the cloud (AWS, GCP, DigitalOcean, etc.).
1. Requirements
There is no unique requirement to install Code-Server, just the regular ones:
• Almalinux | Rocky Linux |Redhat | CentOS server or desktop
• A non-root user with sudo rights
• 1 GB of RAM coupled with 2 CPU cores
2. Run system update
As usual, before starting any tutorial run the system update command to ensure all the installed packages are up to date. This will also refresh the system repository cache.
sudo dnf update -y
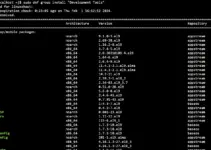
Also, install Curl & Nano tool
sudo dnf install curl nano -y
3. Install Code-server on AlmaLinux or Rocky 8
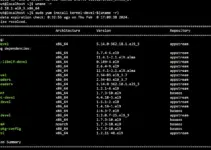
Instead of downloading the Code-Server RPM package manually, let’s use the script that atomically fetches the required packages and after that installs the same. Hence, less manual work needs to do.
curl -fsSL https://code-server.dev/install.sh | sh
Wait for a few seconds, the script will set up everything including the systemd service for VS Code server.

4. Start Systemd VS Code-server service
Once the script completed the process, we have to start the service created by it for Code-Server. Without starting it we won’t be able to access this web-based VS code editor.
sudo systemctl start code-server@$USER
In case those who want to start its service automatically with system boot, also need to enable it; here is the command:
sudo systemctl enable code-server@$USER
To check the status:
sudo systemctl status code-server@$USER
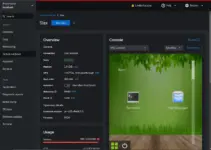
5. Access VS Code Web Interface
By default, the VS code server will only allow to access its web interface using the localhost, hence, if you are using a CLI server or want to access VS code outside your home or office network then edit its YML file. It is a configuration file.
nano ~/.config/code-server/config.yaml
Change 127.0.0.0 to 0.0.0.0.

Save the file Ctrl+O, hit Enter, and then use Ctrl+X to exit.
Restart Code server service:
sudo systemctl restart code-server@$USER
6. Allow ports in Firewall
The default port used by Code-Server is 8080, we need to open it in the system firewall to access VS Code remotely. Also, if you are planning to use some domain name over HTTP/HTTPS, then open ports 80 & 443 as well.
sudo firewall-cmd --add-port={8080,80,443}/tcp --permanent
To apply change refresh the firewall.
sudo firewall-cmd --reload
Now, open any web browser and point it to the server IP address along port 8080 where you have installed the Code-server Instance.
For example:
http://server-ip-addres:8080
Note: server-ip-addres replace with your actual address.
6. Login Code Server running on Almalinux | Rocky Linux 8
You would already have the login interface of Code Server. There you have to enter the password which you will get again in the YML configuration file:
nano ~/.config/code-server/config.yaml
Copy the password given in the file and enter it to log in.


7. How to upgrade
Well this VS code web platform has not been installed using the system repsitory, hence, it is not possible to update or upgrade Code-Server using the dnf update commnad. Therefore whenever you want to install the latest version, simply run the follwing script.
Don’t worry this will not remove user data residing in ~/.local/share/code-server
curl -fsSL https://code-server.dev/install.sh | sh
8. Use Let’s Encrypt with Nginx
Well, if you are planning to use an already existing sub-domain & Cloudflare then you don’t need Nginx or Let’s encrypt; simply point A record of your DNS to your Server address.
Nevertheless, if you own DNS and Domain to use with Code-Server then install Nginx as a reverse proxy and then Let’s encrypt, here is the official Guide on it.
9. Uninstall or Remove Code-server
When you don’t require this VS code server on your system anymore then completely remove the same using the dnf package manager.
sudo dnf remove code-server
Delete data:
rm -rf ~/.local/share/code-server ~/.config/code-server

rm -rf ~/.local/lib/code-server-*
Other Articles:
• Install Code-Server for VS code on Ubuntu 22.04 or 20.04 LTS
• 2 Ways to install VS code on Debian 11 Bullseye Linux
• 4 Ways to install VS Code Editor on Ubuntu 22.04 | 20.04 LTS


there is a typo in step 6.
instead of
“sudo firewall-cmd –add-port={8000,80,443}/tcp –permanent”
should be
“sudo firewall-cmd –add-port={8080,80,443}/tcp –permanent”
Thanks for pointing it out.