When it comes to orchestrating muli-container applications Docker’s Compose tool becomes handy. We can create a single configuration file to quickly deploy and scale multiple containers using it. Whereas, Tags allow you to track different versions of your application. This is essential for ensuring consistency across different environments and when rolling back to a previous version.
In this article, we will explore how to tag Docker images, providing flexibility and control over the versioning of your images.
What is Docker Image Tagging?
A Docker image tag is a label or identifier attached to an image meant for creating containers. It helps differentiate between different versions or variants of an image. Tags are often used to track changes, manage releases, and facilitate version control. By tagging Docker images, you can ensure that the correct versions of images are used while deploying your application.
Step 1: Download or build Docker Image
Well, here we are assuming that you don’t have any existing Docker images, so for example, here we are downloading the Ubuntu one with the default latest tag. Later we tag it with our preferred value which we want.
docker pull ubuntuAlternatively, you can create an image by writing a Dockerfile, which specifies the application’s dependencies and configurations, and then build the image using the docker-compose build command.
Step 2: List Your Docker Images:
Once you have the desired Docker image that you want to be tagged as per your choice, let’s first list all the available images to confirm the one we want to use is there.
This command will display a list of images, including their repository, tag, image ID, creation date, and size.
docker imagesStep 3: Tag the Docker Image:
To tag an existing Docker image, use the docker tag command. You’ll need to specify the source image (by its image ID or repository:tag) and the new tag you want to apply.
Here is the command syntax:
docker tag source-image:source-tag new-image:new-tagNow, for example, we have Ubuntu Image with the latest tag that after building with our desired applications and packages we want to tag with some identifier let’s say – web2.0
so, to do it, the command will be like this:
docker tag ubuntu:latest ubuntu:web2.0Step 4: Verify the Tagging:
Once you have successfully tagged the Docker image you want, to check, list your images again using the Docker images command. You should see the same image with the new tag listed.
docker images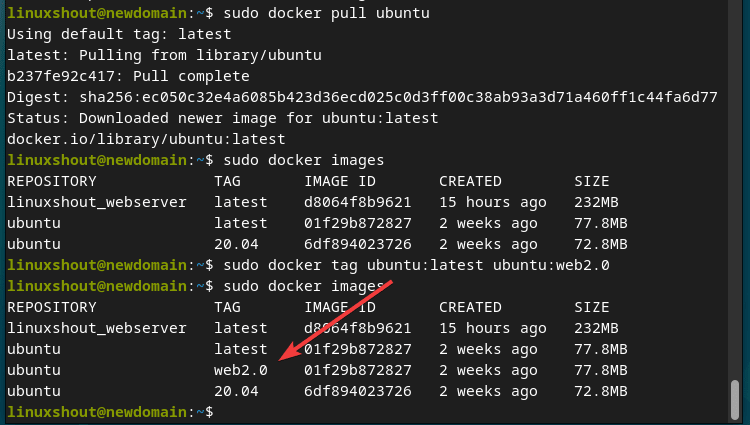
Use the Tagged Image:
Finally, if you want you can even use the tagged image in your deployment process or Docker Compose configurations by specifying the image name with the desired tag as shown in the below example.
version: '3'
services:
  web:
    image:  your-image-name:new-tag  # Updated image tag
    ports:
      - "80:80"
  db:
    image: postgres:12
    environment:
      POSTGRES_PASSWORD: example
Replace your-image-name and new-tag with the appropriate values in your deployment or Docker Compose YAML files.
Deploy Your Application:
Once you are ready with the Docker Compose YAML file, you can use docker-compose up in the same directory where your file is located to run your application .
docker-compose up -dConclusion:
Tagging Docker images is a good practice when we deal with multiple application containers. It allows users to manage containers effectively and enhances version control. By following the steps of this tutorial you will be able to properly and quickly tag your Docker Images. If you are facing any other problem related to it you can refer to the official documentation of the Docker.