CloudWatch is a service provided by the popular cloud computing platform AWS – Amazon web service. It is developed to provide users with an effective way to monitor and manage AWS resources in real-time. It monitors applications, responds to performance changes, optimizes resource use, and provides insights into operational health. To collect data across AWS resources, Cloudwatch offers an agent program, it is a lightweight tool, that is designed to send metrics, logs, and events, and also allows users to set alarms for Amazon Elastic Compute Cloud (Amazon EC2) instances and on-premises servers to CloudWatch. The agent helps simplify the monitoring process and enables users to have a comprehensive insight into the health and performance of infrastructure.
Here in this tutorial, we explain the commands to install the CloudWatch agent on Amazon Linux 2023…
1. AL2023 command terminal access
To run commands, we need access to our Amazon Linux 2023 instance running on AWS Ec2. This can be done using SSH either with the help of AWS Management console web-based SSH or using the local terminal. Whatever, you prefer, first access the terminal and then move to the next step.
2. DNF Update command
After having the Al2023 command line access, first, run the system update command to refresh the repository cache and install the latest updates for already installed applications.
sudo dnf update -y4. Install the CloudWatch Agent on Amazon Linux 2023
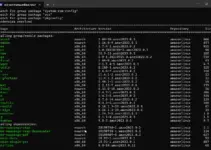
CloudWatch Agent already exists to install through the default system repository of Al2023, therefore nothing complicated needs to be done, just use DNF and the package name which is “amazon-cloud-agent”.
sudo dnf install amazon-cloudwatch-agent
6. Start and Enable the CloudWatch Agent:
Well, after completing the installation, we need to start the CloudWatch Agent service and also enable the same, so that it can get started automatically every time with system reboot.
sudo systemctl start amazon-cloudwatch-agent
sudo systemctl enable amazon-cloudwatch-agent
7. Verify the Installation:
It is recommended to ensure that the service of CloudWatch is running without any error in the background before moving further. We can do this by checking the status of the service, here is the command to use:
sudo systemctl status amazon-cloudwatch-agent --no-pager -l
5. Configure the CloudWatch Agent:
CloudWatch Agent offers a text-based configuration wizard that we can use to easily configure the Agent to collect and send metrics and logs to CloudWatch. For that, we can run the “amazon-cloud watch-agent-config-wizard” command to generate a configuration file interactively:
sudo /opt/aws/amazon-cloudwatch-agent/bin/amazon-cloudwatch-agent-config-wizardThe command will give you multiple prompts, select your choice according to your preferences. Also, if you have not configured your AWS credentials and region, then the Wizard will also ask for that to be set up.
8. (Optional) Additional Configuration:
Later after setting up CloudWatch Agent configuration, if you want to customize its configuration to meet the specific monitoring requirements then don’t need to start the Wizard again. It can be done by editing its configuration file located at
sudo nano /opt/aws/amazon-cloudwatch-agent/etc/amazon-cloudwatch-agent.jsonThese were the quick steps to install and configure CloudWatch Agent on the Amazon Linux 2023 instance. To know further about it, refer to the official documentation file.
Other Articles: