Node Version Manager (NVM) is a powerful tool used by developers to manage multiple Node.js versions. It is an indispensable tool for Java developers who work on different projects that require older or newer versions. Using NVM it becomes easy to test applications across different versions of Node which provides assurance, that the app could work smoothly and be compatible with specific Node environments.
One of the key features of NVM is its ability to install and set a default Nodejs Version as the user’s choice. Moreover, the users don’t need to start a new terminal session to work with the changed version. Well, coming to the point, in this article we will learn the process of installing NVM and use it to set the default Node version.
Why Use NVM?
Let’s know the three reasons why NVM is essential for developers.
- NVM allows users to install multiple Node.js Versions and switch between them without conflicts.
- Different projects might require different Node.js versions. NVM makes it easy to switch across these versions as needed.
- NVM simplifies the process of managing Node.js versions, making it accessible even for beginners.
Steps to Set the Default Node Version using NVM
1. Open the Terminal:
Start the terminal on your Linux, Windows, or Mac to access the NVM command line tool. This can be done in the system application menu or by pressing the shortcut such as in Ubuntu using – Ctrl+Alt+T.
2. Installing NVM
Well, if you are looking to use the NVM then you might already have it on your system, if yes, then move to the next step. However, those who don’t have NVM can download it from its GitHub page. Whereas the Linux users can simply run the given command to install NVM on their system.
curl https://raw.githubusercontent.com/creationix/nvm/master/install.sh | bash
3. Check Installed Node Versions:
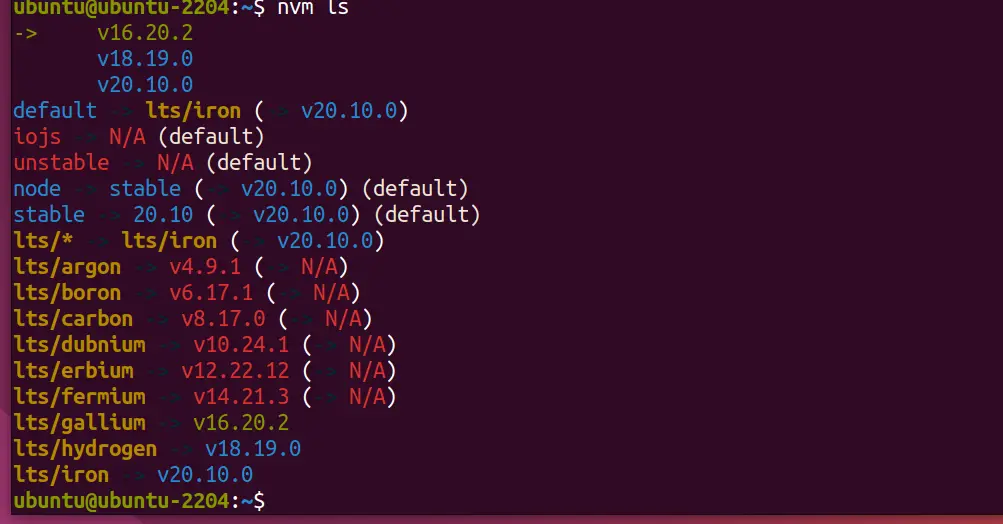
To see a list of all Node.js versions installed on your system, use the “nvm ls” command, also given below. It will display all the Node versions already available on the system to use and also indicate the current default version in use.
nvm lsThe installed versions of Nodejs are denoted using the blue color whereas the red ones are available to install using NVM.
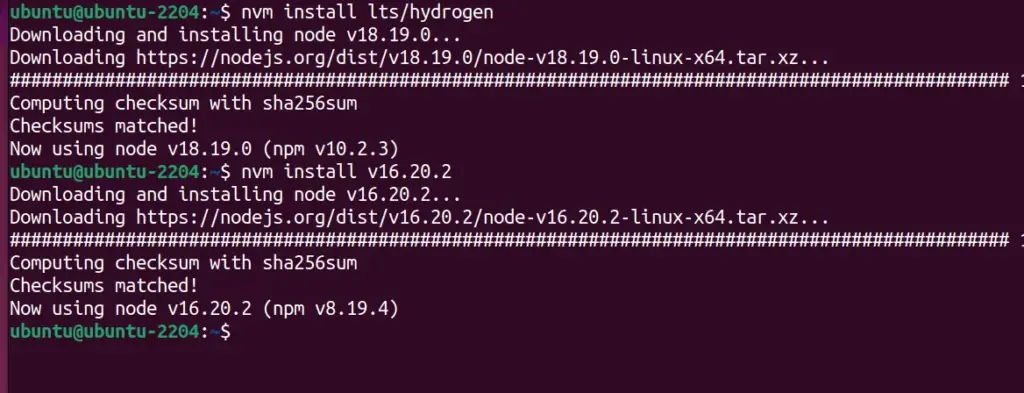
4. Install a New Node Version (if necessary):
Well, if you have only one version of Nodejs and the version you want to set default is not available on the system then we can get it using the NVM command, here is that.
nvm install <version>Replace <version> with the specific version number, like 18.19.0. Alternatively, you can just mention the name of the version such as “lts/hydrogen”.
5. Set the Default Node Version using NVM:
Now, come to the main command which you would be looking for in this article i.e. how to see the default version of the required Node using the NVM.
To set a Node version as the default, use:
nvm alias default <version>Again, replace <version> with your desired Node.js version number.
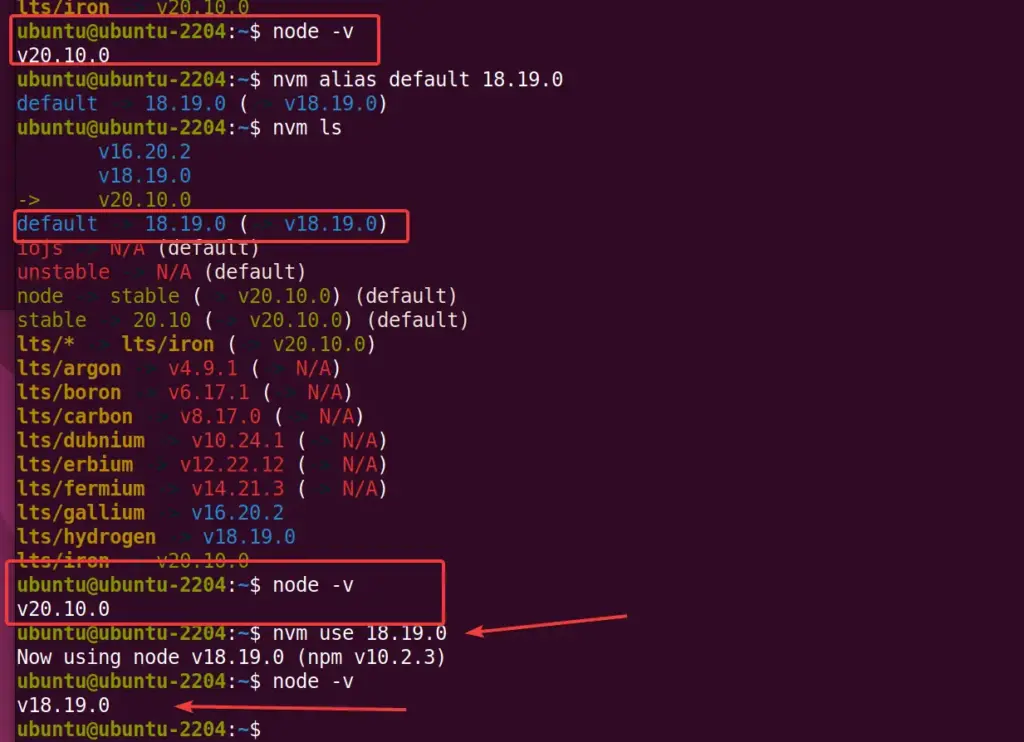
For example: Our current default is V20.10.0 and now we want to change and set it to V18.19.0 then the command will be:
nvm alias default 18.19.0The “nvm alias default” command sets a particular Node.js version as your standard for all projects and terminal sessions, this is a permanent change until you decide to change the default again.
However, your current session will remain using the version which installed recently or set by you previously. Therefore, to switch to the latest version or any other for your current terminal session we use the “nvm use” command:
nvm use <version>Example:
nvm use 18.19.0
The nvm use command in Node Version Manager (NVM) is used to switch the Node.js version for the current terminal session. However, this change is temporary and only affects the current terminal session, hence as soon as you start a new terminal session the Node version will return to the default one set using the nvm alias default <version> command.
In short, the “nvm use” command Is typically used when you need to quickly switch between Node.js versions for testing or running applications that require different Node versions but only for the current session not permanently.
In the given screenshot you can see we have changed the default version from v20.x to v18.x but when we checked it, the current session remains showing the v20.x to change that as well we have used the “nvm use” command.
6. Verify the Default Version:
Furthermore, you can always ensure that the default has been set correctly, by closing and reopening your terminal app. To check the current node version type node -v and it will display the version you set as default.
Conclusion
NVM is a must-have tool for Node.js developers because of the flexibility and control it offers over Node environments. We believe by following the steps of this tutorial, you will be able to set the default Node.js version effortlessly. With the ability to easily switch and manage Node versions, it becomes easy to tackle projects with varying Node.js requirements, enhancing your development workflow.