The FreeNas which all we know is the open-source NAS operating based on FreeBSD. It helps millions of people to turn their old PC system into a personal NAS box without spending money. So, if you want to try it before installing it to your main system or server you can test it on Virtual Machine: Install FreeNAS on VirtualMachine.
However, in this article, we let you know how to create a FreeNAS bootable USB drive and then use that to install FreeNAS on any other Pen or USB drive.
1: Download the Universal USB Installer Tool
First of all download the Universal USB Installer Tool. We use it to write the FreeNAS.iso image to our Pendrive to make a bootable FreeNAS USB drive. The download link is here.
2: Get FreeNAS.ISO image
Second thing, we require is the FreeNAS.ISO image. If you already have this then move to the next step otherwise here is the link to download.
3: Run the portable USB maker Universal USB
After downloading run the Universal USB Installer tool, it is a portable USB maker. Just Double click on the Universal USB Installer tool .exe file.
4: Install Freenas on USB
Click on the Dropdown box and select Try Unlisted Linux ISO (GRUB). Select the downloaded FreeNAS.ISO file by clicking Browse button. After that select the USB drive from the right side drop-down box. Then Choose Fat32 Format.
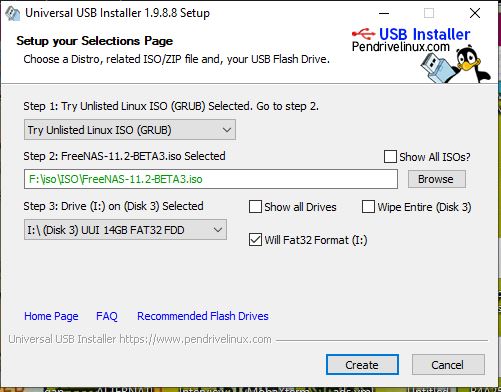
Now click on the Create button. It will take a few minutes to the tool to create a bootable FreeNAS USB drive.
5: Boot with FreeNAS bootable USB drive
Once it has done! Let the FreeNAS bootable USB drive as it is and attach one more blank pen drive where we will install the FreeNAS OS.
Note: You can’t install FreeNAS on the same bootable USB drive. You should have one spare which we will use to install the FreeNAS bootable and other system files.
- Now I assumed that you have attached both USB drives (the one you FreeNAS bootable we made above and other one blank at least 8GB) to your computer system.
- Restart the PC and boot it using the FreeNAS bootable thumb drive which created above.
- As soon as the PC booted up with the FreeNAS, you will get a black window with the option to boot the FreeNAS.
- Press Enter.
- The FreeNAS installer set up will boot up. ( For the installation steps you can refer to this link)
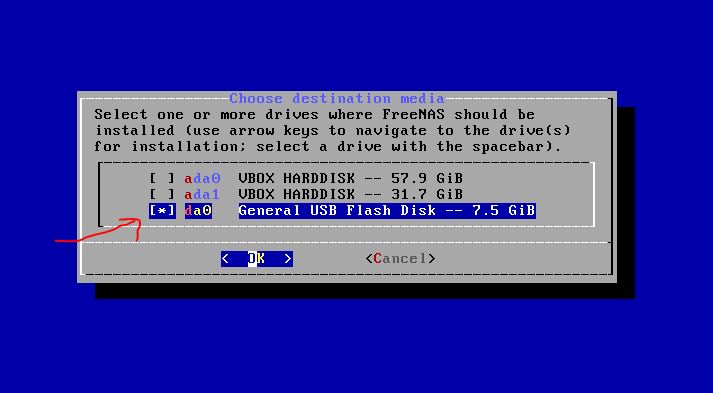
When the installer asks you to choose the hard drive to install the FreeNAS at that time select your USB drive. Like we did in the following screenshot.
From there follow the guided steps of installation.
Once the installation is done. Remove the FreeNAS bootable drive but not the drive in which you installed it.
Whenever you want to use the FreeNAS simply boot your computer with the drive in which you have installed the FreeNAS. Even you can use it as a portable drive to run the FreeNAS on any other system of your home or friend.
Other useful Resource

I followed these simple instructions on 2 separate USB drives and it ruined both of them. Left me with a 574MB partition and 14.36GB of unused space that I cannot do anything with.
This happens with Win32Disk manager tool. If you want to undo the USB partitions then simply follow this:https://www.how2shout.com/how-to/how-to-delete-or-unpartition-a-usb-drive-partitions-on-windows-10-8-7.html
OR either use PenDriveLinux- Universal USB Installer:https://www.pendrivelinux.com/universal-usb-installer-easy-as-1-2-3/
It will not create partitions rather install all files in a single partition…
Bonjour Rajkumar Maurya je cherche un sujet pour la fin de mes études universitaire…
du coup j’avais pensé à me pencher sur “STOCKAGE EN RESEAU ” pour moi le NAS me convier parfaitement
mais le probleme est que je ne sais pas grand chose ni comment je veux pouvoir le defendre devant le jurie…
alors si vous pouver m’expliqué comment foctionne avec les RAID cette fois-ci biensure j’aimerais le faire en virtual pour la defence dans 2mois a partir de maintenant 12/09/2019…
voici mon mail “[email protected]”