The default PostgreSQL 15 is available to install on Debian 12 bookworm Linux, however, if you want to version 16, or any other then the steps of this tutorial will help you in doing that.
Most of us would know about only MySQL or MariaDB when it comes to hosting web applications or CMS such as WordPress but there are other enterprise-grade Database systems available such as PostgreSQL. It is also an open-source relational database management system that is known for its robustness, extensibility, and standards compliance.
Here are a few benefits of using PostgreSQL:
- Open Source and Community-Driven
- ACID (Atomicity, Consistency, Isolation, and Durability) Compliance.
- Extensibility and Customization
- Advanced Data Types support such as arrays, hstore (key-value pairs), JSON, and even support for creating custom data types.
- Full-Text Search
- Concurrency Control which allows multiple transactions to occur simultaneously.
- PostgreSQL supports Foreign Data Wrappers, enabling the integration of data from external sources into the database.
- Includes robust security features such as role-based access control, SSL support for encrypted connections, and more…
- Community Support and good documentation
- Replication and High Availability:
Let’s take a look at commands that can be used to install the latest version of PostgreSQL on your Debian systems
This guide will work for:
- Debian bookworm (12.x)
- Debian bullseye (11.x)
- Debian buster (10.x)
- Debian Sid
Step 1: Refresh the Package list
Access the command terminal of your Debian 12 or any other version you are using either directly, if installed locally, or via SSH for some remotely or cloud-installed Debian system.
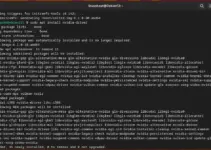
Once you have the access, run the system update command to rebuild the APT package index cache and install the latest available updates.
sudo apt update && sudo apt upgrade -yAlso, install cURL:
sudo apt install curlStep 2: Add the PostgreSQL GPG key & Repository
Well, before adding the repository you must know what version of the PostgreSQL you want or compatible with the application that’s data you want to save in your Database server.
Note: Well, if you are a user of Debian 12 and only looking for the PostgreSQL 15 version then no need to add an extra repository just run the installation command given in the next step.
To check the version of the database available through your system repo, you can use:
sudo apt-cache policy postgresqlWhereas to get the old or current versions on Debian 12, 11, and 10 you can use repository given below, if the version of the Database you required is not available through the system’s default repo:
Add the GPG Key:
curl -fsSl https://www.postgresql.org/media/keys/ACCC4CF8.asc | gpg --dearmor | sudo tee /usr/share/keyrings/postgresql.gpg > /dev/nullNow, add the repository:
echo deb [arch=amd64,arm64,ppc64el signed-by=/usr/share/keyrings/postgresql.gpg] http://apt.postgresql.org/pub/repos/apt/ $(lsb_release -cs)-pgdg main | sudo tee /etc/apt/sources.list.d/pgdg.list
Run the system update:
sudo apt update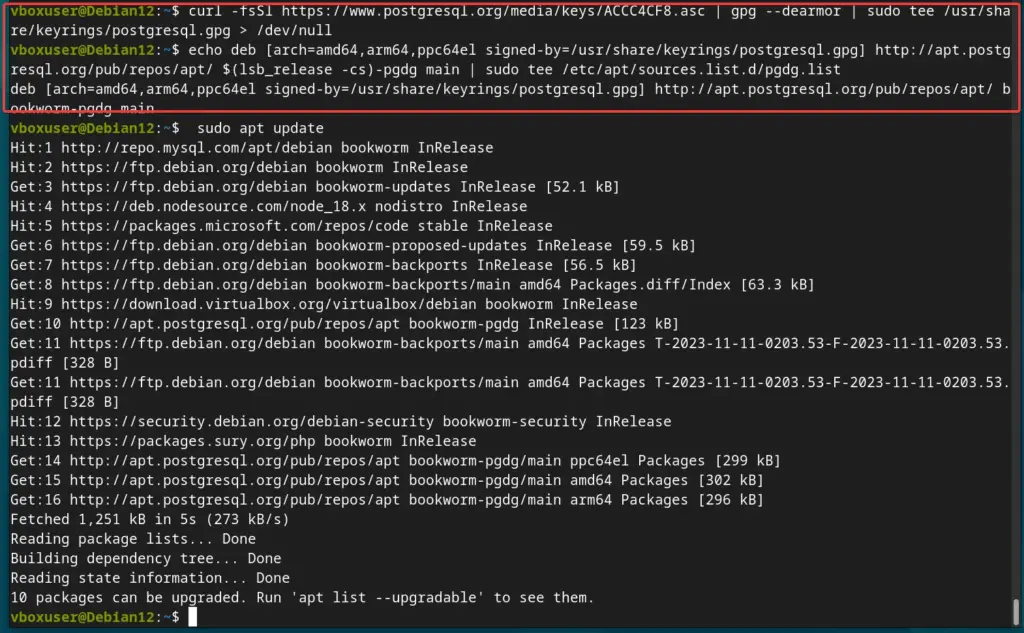
Step 3: Installing PostgreSQL on Debian 12, 11 or 10
After adding the official repository of PostgreSQL on your Debian system you can get the current or old supported versions easily. You just need to execute the given command:
Note: Install only one version as per the need of your applications.
- For version PostgreSQL 16.x server & client
sudo apt install postgresql-16- For version PostgreSQL 15.x server & client
sudo apt install postgresql-15- For version PostgreSQL 14.x server & client
sudo apt install postgresql-14- For version PostgreSQL 13.x server & client
sudo apt install postgresql-13- For version PostgreSQL 12.x server & client
sudo apt install postgresql-12Note: Those who don’t want the PostgreSQL Database server and just looking for the client to connect to some remote Database server can go for the given command:
Replace 16 with the version of client you want…
sudo apt install postgresql-client-16Step 4: Verify PostgreSQL service status:
As you have completed the previous step’s process sucessfully, the database server will be on your Debian Linux system. To confirm whether PostgreSQL is active and running without any error, we can check its service status, here is the command to do that:
sudo systemctl status postgresql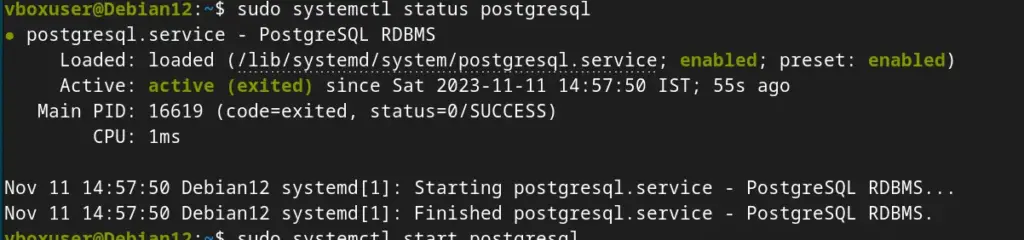
By default, the Database listens to 5432 for incoming connections. You can check that as well:
ss -nlt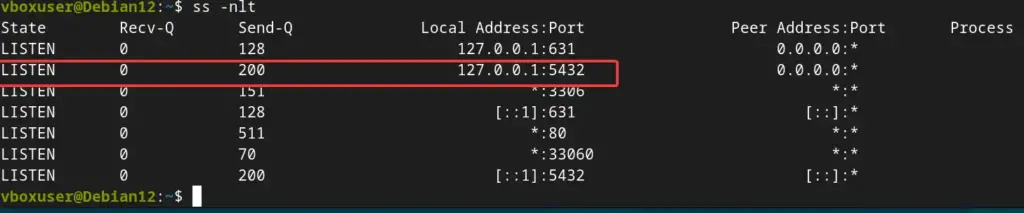
For your knowledge- To manage its service, you can use:
To restart:
sudo systemctl restart postgresqlTo stop:
sudo systemctl stop postgresqlTo disable at startup:
sudo systemctl disable postgresqlTo enable again:
sudo systemctl enable postgresqlStep 5: Secure the Database
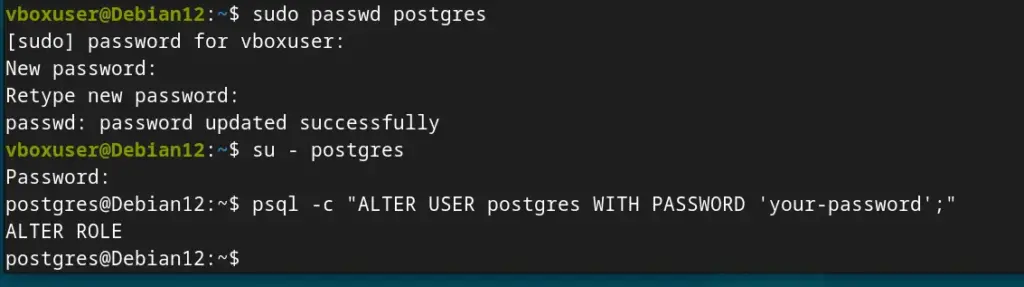
To make sure our PostgreSQL is secured with a strong password, set a password for its system user and then change the default database admin user account using the below-given commands:
Change the default PostgreSQL system user password
sudo passwd postgresLogin using Postgres system account-
su - postgresNow, change the Admin database password-
psql -c "ALTER USER postgres WITH PASSWORD 'your-password';"Note: Replace your-password in the above with a secure password that you want to set for the admin database user.
Step 6: How to create a new database
Let’s say you want to create a database on PostgreSQL to use with some application, then here are the commands to follow-
Login with Postgre system user-
su - postgresSwitch to its command line:
psqlCreate a new user. Here we are creating a demo user protected by a password. Change them.
CREATE USER demo WITH PASSWORD 'password';Create new PostgreSQL database-
CREATE DATABASE h2sdb;Now, let’s Grant all rights or privileges on created database to the user:
GRANT ALL ON DATABASE h2sdb TO demo;However, the owner of the Database still will be the default Admin user of PostgreSQL to change that you can use the command-
Syntax:
ALTER DATABASE database_name OWNER TO user-name;
Example:
ALTER DATABASE h2sdb OWNER TO demo;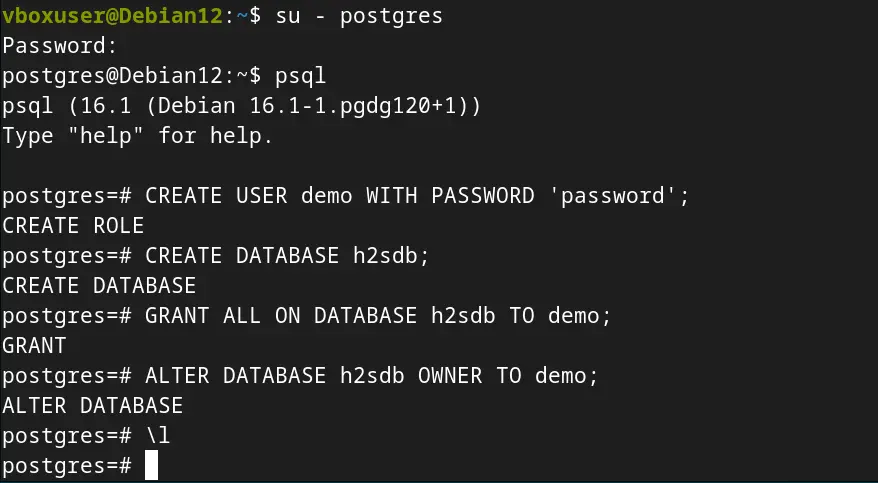
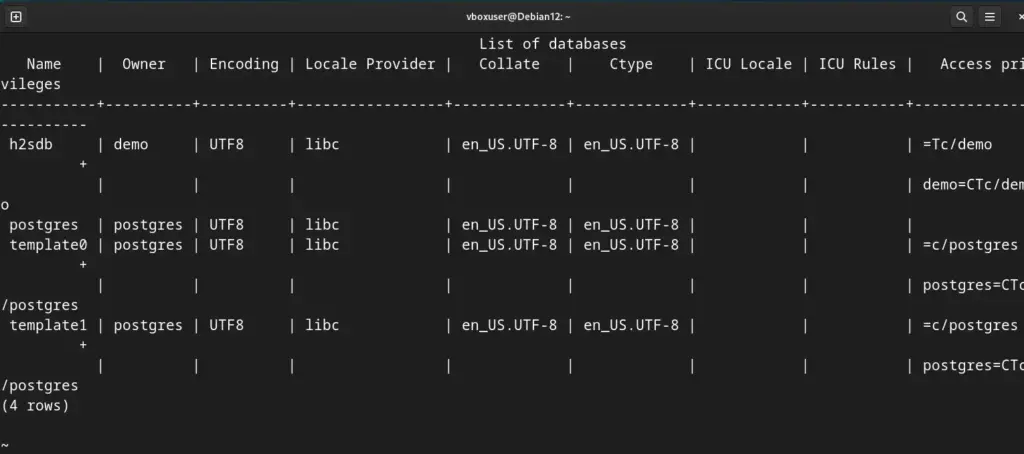
You can list all PostgreSQL databases to check and confirm whether the database has been created or not simply type
\lTo exit press – q button and to exit the command line use \q and to completley exit the user use type – exit
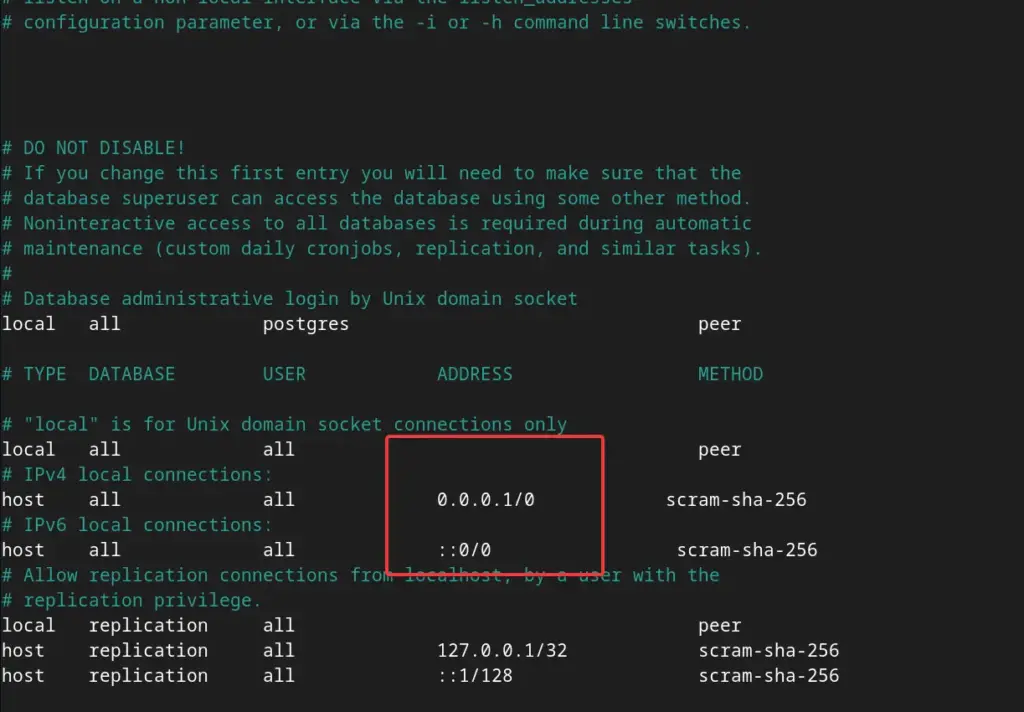
Step 7: Configure PostgreSQL to access remotely
By default, this database server will listen only to the localhost, to access it remotely, we need to perform some changes in its configuration file. We can limit it to some particular IP address or open it for all.
sudo nano /etc/postgresql/16/main/postgresql.confNote: If you are using some other version of the Database then change number 16 with that in the above command.
In the Configuration file, find – listen_addresses and first, remove the # given in front of it. After that replace localhost with * sign to allow all Ip-address to connect to the Database server, whereas to limit it to some particular Ip-addresses then type them instead of ‘*‘. Multiple addresses need to be separated with commas.
Save the file by pressing Ctrl+X, Y, and hitting the Enter key.
Restart the Database server to apply the changes:
sudo systemctl restart postgresqlCheck whether it listening for all addresses or not, for that you can run:
sudo apt install net-toolssudo netstat -antup | grep 5432Output:

Finally, open port ‘5432’ in the firewall:
sudo ufw allow 5432Step 9. Uninstall PostgreSQL from Debian 12
If you don’t require the Database server or client anymore on your Debian Linux then we can completely remove it. However, note this will also remove all the Databases created using PostgreSQL from your system. Hence, make sure to take a backup.
sudo apt remove postgresql*For some specific version removal, you have to mention the same. For example, you have multiple versions of the PostgreSQL installed and want to remove only 16.
sudo apt remove postgresql-16*For only client:
sudo apt remove postgresql-client-16Other Articles: