Learn the commands to install Apache Cassandra on Rocky Linux or AlmaLinux 8 server using your terminal given in this tutorial.
Apache Cassandra is the most popular NoSQL column-oriented database and is written in Java, unlike both MongoDB (C++) and HBase. Due to its architectural properties, Cassandra is often used in big data projects, but can also be used well for complex web applications in cooperation with an application server/framework.
Cassandra is a distributed database management system that is designed to manage very large amounts of structured data and belongs to the class of NoSQL database systems,
In addition to being used as a distributed database in social networks – the database is also used, for example, by the social news aggregator Reddit and the social bookmarks provider Digg.
Steps to install Apache Cassandra on Rocky Linux 8 | AlmaLinux 8
The steps given here will be the same for other RedHat-based Linux distros such as CentOS 8 and Oracle Linux…
1. Run DNF update
Let’s first run the system update command to ensure installed packages on the system are up to date and also this will refresh their repository cache.
sudo dnf update
Enable EPEL and PowerTools as well:
sudo dnf install yum-utils
sudo dnf install epel-release
sudo dnf config-manager --set-enabled powertools
2. Install Default OpenJDK- Java
As Apache Cassandra has been written in Java, hence we need that; the Java Development Kit that also offers a Runtime environment available via the default base repository of both Amalinux and Rocky using the DNF packages manager as OpenJDK.
Versions of Java supported by Cassandra while writing this article were: Java 8 or Java 11.
Hence, let’s first install the same:
sudo dnf install java-11-openjdk
3. Add Cassandra repository Rocky | Almalinux 8
The packages to install are not available to install using the default base of repo of either Rocky Linux or AlmaLinux 8, hence we have to add it manually. The benefit of using a repository to install Cassandra is we can easily get future updates for the Database by running the system update command. You can confirm the latest version on the official website.
sudo dnf install nano -y
Create a repository file:
sudo nano /etc/yum.repos.d/cassandra.repo
Note: The latest major version while doing the article was 4.0 and the corresponding distribution name is 40x (with an “x” as the suffix). For older releases use 311x for C* 3.11 series, 30x for {30_version}, 22x for {22_version} and 21x for {21_version}. For example, to add the repository for version 4.0 (40x):
Copy-Paste the following lines:
[cassandra]
name=Apache Cassandra
baseurl=https://downloads.apache.org/cassandra/redhat/40x/
gpgcheck=1
repo_gpgcheck=1
gpgkey=https://downloads.apache.org/cassandra/KEYS
Save the file using Ctrl+O, hit the Enter Key, and then exit by Ctrl+X.
Run the update command to update the repository cache.
sudo dnf update -y
4. Install latest Apache Cassandra on Almalinux | Rocky 8
Once the repository is added, we can easily install the latest version of Apache Cassandra on Rocky Linux 8 or AlmaLinux 8 using the DNF package manager.
sudo dnf install cassandra -y

5. Start & Enable Cassandra service
Well, we already have successfully completed the installation, now need to start the service of this NoSQL database, and if you want it to start automatically with system boot or in case of the crash then don’t forget to enable the service.
sudo service cassandra start
sudo systemctl enable cassandra
To check the service is enabled successfully, run:
sudo systemctl is-enabled cassandra.service
To check current status:
sudo systemctl status cassandra

6. Verify Cassandra is running
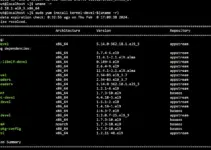
To make sure the database is running and properly working at 127.0.0.1:7199, run the given command:
nodetool status
You will get the output as given in the screenshot.

7. Key Configuration files
The directory where the Apache Cassandra data is stored- /var/lib/cassandra whereas the configuration files are at /etc/cassandra and Java start-up options can be configured in the /etc/default/cassandra file.
By default, the Database can only listen to localhost, however, if you want to use the client to connect Cassandra remotely then we need to configure the same by editing:
sudo nano /etc/cassandra/default.conf/cassandra.yaml
8. Cassandra Query Language
Use the command-line tool called cqlsh comes along with the Cassandra package to query it using the terminal. To use it the system must have at least a python 2 package installed.
If you don’t have Python on your system then run:
sudo dnf install python2
To get the CQL shell, run:
cqlsh

9. Change Cluster name
To update the cluster name, switch to CQL Shell using the above-given command and then run this one:
UPDATE system.local SET cluster_name = 'H2s Cluster' WHERE KEY = 'local';
Then exit the shell:
exit;
After that edit the YAML configuration file:
sudo nano /etc/cassandra/default.conf/cassandra.yaml
Replace the Test Cluster with the name you set for your Cluster.

After that, flush the cache and restart the Cassandra service:
nodetool flush system
sudo systemctl restart cassandra
To confirm Cluster name has been updated:
cqlsh
DESC CLUSTER

To manage Cassandra using GUI, see this GitHub Project
10. Enable User Authentication
Back up your current configuration file to ensure in case something goes wrong we can restore the original file.
sudo cp /etc/cassandra/conf/cassandra.yaml /etc/cassandra/conf/cassandra.yaml.backup
Edit yml file:
sudo nano /etc/cassandra/conf/cassandra.yaml
Find the following line in the file and change their values as given below:
authenticator: org.apache.cassandra.auth.PasswordAuthenticator
authorizer: org.apache.cassandra.auth.CassandraAuthorizer
roles_validity_in_ms: 0
permissions_validity_in_ms: 0
Save the file you are done with editing using Ctrl+O, hit the Enter Key, and then Ctlr+X.
For example, see the screenshot:

Restart Cassandra Service:
sudo systemctl restart cassandra
11. Add Admin user for your Database
Change the default user and password to whatever you want:
cqlsh -u cassandra -p cassandra
CREATE ROLE myusername WITH PASSWORD = 'mypassword' AND SUPERUSER = true AND LOGIN = true;
Note: Replace- myusername and mypassword with whatever you want to set.
Exit the Command Shell of Cassandra:
exit;
Now, log in again using your new user and password.

Disable the SuperUser or Admin rights for default Cassandra user after login with the newly created user:
ALTER ROLE cassandra WITH PASSWORD = 'cassandra' AND SUPERUSER = false AND LOGIN = false;
Grant all permission for your user:
GRANT ALL PERMISSIONS ON ALL KEYSPACES TO 'myusername';
exit;
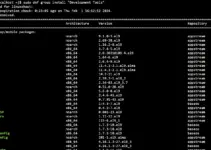
Once the Authentication and Admin user is created, you always need that to log in and user Cassandra command Shell. Without user authentication, you will get the following output:
Connection error: (‘Unable to connect to any servers’, {‘127.0.0.1:9042’: AuthenticationFailed(‘Remote end requires authentication’,)})
12. How to update Cassandra on AlamLinux or Rocky Linux
As we have installed this NoSQL database by adding its repository, hence running the system update and upgrade command will also fetch and install the latest version update.
sudo dnf update && sudo dnf upgrade
13. Uninstall or Remove
This is an optional step, and use it when you want to remove Cassandra from your system.
sudo dnf remove cassandra
Remove Repo
sudo rm /etc/yum.repos.d/cassandra.repo
Other Articles:
• Install Puppet Server & Agent on Rocky | AlmaLinux 8
• How to Install OpenStackClient in Rocky Linux | AlmaLinux 8
• Command to Permanently Disable SELinux on Rocky | AlmaLinux 8