Let’s learn the steps and commands to install LXD/LXC on AlmaLinux or Rocky to start creating containers using the LXC command line or Graphical user interface.
LXD, the “Linux Container Daemon”, is a management tool for Linux operating system containers built using LXC. LXC is a container-based virtualization technology at the level of the operating system. Both have been developing by Canonical, the company behind Ubuntu Linux.
To understand LXD, let’s first know what exactly the LXC is?
LXC is a short form or acronym that stands for “Linux containers”. It meant to virtualize applications at the operating system level within the Linux kernel. Technically, LXC combines isolated namespaces and the “cgroups” of the Linux kernel to implement isolated environments for the execution of code. Historically, LXC was also the basis for the widespread Docker virtualization technology. It is not like the traditional virtualization platforms such as Hyper-V, Vmware, and KVM, instead, apart from virtualizing complete OS inside containers, it also lets your run individual software or applications in virtual environments.
Whereas, to make the administration of LXC containers easier, developers created LXD, an extension to LXC. With the help of LXD, the containers can be configured and controlled using per-defined sets of commands. It uses libxlc to connect the LXC software library. It is written in GO languages and creates a system daemon that apps can access locally using a Unix socket, or over the network via HTTPS. Thus, helpful in automating mass container management and is used in cloud computing and data centers.
Steps to Install LXD/LXC on AlmaLinux or Rocky 8
This tutorial is also applicable for Fedora, CentOS 7/8, and RHEL 8.x.
1. Add EPEL repository
Whether it is to install LXC or LXD, for both we need to have EPEL on our RPM-based Linux operating system even for CentOS or RHEL 8. Thus, use the given command and first enable the Extra Packages for the Enterprise Linux repository.
sudo dnf install epel-release
2. Update system
To update system installed packages so that they could achieve their latest state, run the system update command. This will also refresh the repo cache.
sudo dnf update
3. Install SNAPD on AlmaLinux
If we only have to install LXC on AlmaLinux or Rocky then we don’t need to use SNAP because its packages are available to install through EPEL. However, LXD is available in the Snapcraft repo, thus we need to install and enable the SNAP daemon on our Linux system, first.
sudo dnf install snapd -y

sudo systemctl enable --now snapd.socket

sudo ln -s /var/lib/snapd/snap /snap
4. Instal LXD/LXC on AlmaLinux or Rocky 8
Now, we can run the regular snap command to get and install the packages for LXD on our RPM Linux system. Here is the command-
sudo snap install lxd
5. Reboot system
Once the installation is completed restart your server system to properly integrate and apply the changes that have been made due to the installation of LXD.
sudo reboot
6. Add your user or LXD group
After the installation is completed and you have successfully rebooted your server or desktop, it’s time to add our current user to the LXD group otherwise to run every command of it we have to use sudo.
sudo usermod -aG lxd $USER
newgrp lxd
7. Initialization
Let’s perform the initial configuration with help of the guided options given by the LXD. Run:
lxd init
Here for the storage pool select LVM if your system storage is not in the default brtfs.

Also, allow the network bridge connection through the firewall:
sudo firewall-cmd --add-interface=lxdbr0 --zone=trusted --permanent
sudo firewall-cmd --reload
8. Let’s create a container
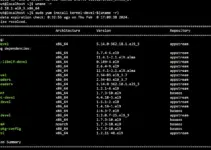
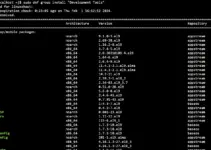
Now, we already have all things we need to start creating containers using different LXC images available at – images.linuxcontainers.org.
The syntax is-
LXC launch images:distro/version/Architecture container-name
distro– The type of distro you want to install such as Ubuntu, CentOS, Mint, Arch, Amazon Linux, etc.version– Version of the distroArchitecture– CPU architecture for distro- amd4, armhf, i386, ppc64el, and others.container-name– The name you want to give to your container to easily manage it later.
For example, we want to install ARCH and Ubuntu Containers using the image available for amd64 in the LXC library. The command will be:
For Arch Linux
LXC launch images:arch/current/amd4 myarch
For Ubuntu Focal
LXC launch images:ubuntu/20.04/amd4 ubuntu-20
9. To List all containers
After installing multiple Images to create containers, we can list them all to check what are the available ones in our virtual environment.
lxc list

10. Stop, Restart, Delete LXC containers
As we launch a container it will get started automatically, however, if you want to stop, restart or even delete them, then here are the commands to follow:
lxc start container-name
lxc stop container-name
lxc restart container-name
lxc delete container-name
Example: Here we have installed Arch, thus to stop it, the command will be like this:
lxc stop arch

11. Access Container bash
Now, to access the root user and shell of any installed container, so that we can issue various commands to it. Here is the way-
lxc exec conatiner-name-- /bin/bash
For example, we have installed Ubuntu 20.04, thus to access its root user and its bash- we run:
lxc exec Ubuntu-20 -- /bin/bash

12. LXD GUI to manage LXC conainers
If you don’t want to use the command line then we can install a web graphical interface to manage LXC containers using lxdmosaic available as a script as well as in SNAP.
As we already have snap-on our system, thus we use that.
sudo snap install lxdmosaic
Assign ports to lxdmosaic web interface
sudo snap set lxdmosaic ports.http=81 ports.https=444
Allow ports in the firewall:
sudo firewall-cmd --zone=public --add-port=81/tcp --permanent
sudo firewall-cmd --zone=public --add-port=444/tcp --permanent
sudo firewall-cmd reload
Enable access to LXD hosts over the network and set a password for the same.
lxc config set core.https_address [::]
lxc config set core.trust_password your-password
Note: Replace your password in the above command with the one you want to set for it.
Restart SNAP:
sudo systemctl restart snapd
13. Access Web GUI interface
Open system browser locally on your AlmaLinux or Rocky, if you are using the CLI server version then any other computer that can access the IP address of your Server.
Type- https://server-ip-address:444
If you get an SSL error, then click on the Advanced button given there and click Continue IP-address Unsafe.
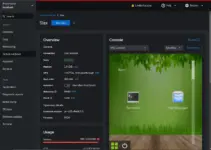
You get the web interface:
- Under the host- Type your LXD server IP address and in the password the one you have set above in Step 11 of this article.
- Create Admin user for LXD Mosaic. By default username will set to admin (you can change that), you just need to set a password for the same as per your choice.
- After that click on the Launch LXC Mosiac green button given on the right top side.

Enter the username and password you have created above and Sign in.

Finally, you have the Graphical user interface to manage all your LXC containers running on AlmaLinux or Rocky Linux 8.


Closing thoughts:
So, this was a brief tutorial on installing, creating, and deleting LXD/LXC containers on AlmaLinux or Rocky Linux including CentOS/RHEL 8. Furthermore, to manage things easily, we can use the Mosiac graphical user interface. In case you are facing any problem, let us know the comment section is all yours…