We just need a basic knowledge of Linux commands to install LibreNMS on Ubuntu 22.04 or 20.04 Linux servers for setting up our own network monitoring system.
LibreNMS is for those who want an open-source web-based PHP platform for monitoring and managing network infrastructure plus devices. Its interface is designed to provide a one-stop place for network administrators and IT professionals to monitor routers, switches, servers, and other network-related equipment.
LibreNMS provides a range of features and capabilities such as:
- Automatic Device Discovery
- Real-time monitoring of network devices, services, and performance metrics.
- Admins can track key parameters like bandwidth usage, CPU utilization, memory usage, and more.
- Alerting and Notifications
- Offers historical data storage to analyze trends and troubleshoot past issues.
- It offers various graphing options to visualize performance data.
- Support for SNMP
- Offers integrations with other tools and services, including notification services like Slack and PagerDuty.
- Highly customizable
- Web-Based User Interface
- Community and Open Source
- You can extend LibreNMS’s functionality through plugins and add-ons.
Step 1. Prerequisites – Setting Up Your Server Environment
Before performing the LibreNMS installation, you need a system running with Ubuntu Linux with sudo rights and an internet connection. Apart from that rest of the things we require is the LAMP server which we learn here in this tutorial how to set up.
Well, before moving forward, run the system update and upgrade command:
sudo apt update && sudo apt upgradeStep 2. Installing Apache or Nginx on Ubuntu 22.04
Two popular web servers to use for installing LibreNMS are Apache and Nginx, you can go for any of them as you want. However, here we will perform this tutorial with both but you choose to install only one of them as per your preference.
Note: Install only one web server Apache or Nginx:
For Nginx:
sudo apt install nginxsudo systemctl enable --now nginxFor Apache:
sudo apt install apache2sudo systemctl enable --now apache2Step 3. Installing PHP, MariaDB, and Dependencies
Here we will install PHP, MariaDB, and other required packages to set up LibreNMS easily on Ubuntu 22.04 or 20.04. To install all of them, we can use the given command:
sudo apt install acl curl nano composer fping git graphviz imagemagick mariadb-client mariadb-server mtr-tiny nginx-full nmap php-cli php-curl php-fpm php-gd php-gmp php-json php-mbstring php-mysqli php-snmp php-xml php-zip rrdtool snmp snmpd whois unzip python3-pymysql python3-dotenv python3-redis python3-setuptools python3-systemd python3-pipStep 4. Configure MariaDB for LibreNMS
Before creating a database, let’s configure the MariaDB for LibreNMS, so edit the configuration file of the database server.
sudo nano /etc/mysql/mariadb.conf.d/50-server.cnfUnder [mysqld] add the following lines:
innodb_file_per_table=1
sql-mode=""
lower_case_table_names=0
Save the file by pressing Ctrl + O, type Enter, and use Ctrl + X to exit.

Restart Database service:
sudo systemctl restart mariadbAnd enable the same:
sudo systemctl enable mariadbSecure your MariaDB:
sudo mysql_secure_installationFollow the guided wizard, create a password for the database root user and remove the demo database, disallow remote login and anonymous users.
Step 5. Creating the LibreNMS Database
Now, let’s create a dedicated Database to store the data generated by the LibreNMS.
sudo mysqlUse the given commands to create a Database.
Here we are using Database & Username- librenms, use whatever you want to use. Also, don’t forget to replace the password with what you want to set.
CREATE DATABASE librenms CHARACTER SET utf8mb4 COLLATE utf8mb4_unicode_ci;CREATE USER 'librenms'@'localhost' IDENTIFIED BY 'password';GRANT ALL PRIVILEGES ON librenms.* TO 'librenms'@'localhost';FLUSH PRIVILEGES;exit;Set TimeZone for PHP:
sudo sed -i "s,;date.timezone =,date.timezone = \"Asia/Kolkata\",g" /etc/php/*/cli/php.inisudo sed -i "s,;date.timezone =,date.timezone = \"Asia/Kolkata\",g" /etc/php/*/fpm/php.iniNote: Change the Asia/Kolkata as per your country. If you don’t know the PHP value for your timezone refer to the official page meant for it.
Also, change the system timezone accordingly:
sudo timedatectl set-timezone Asia/Kolkatasudo dpkg-reconfigure -f noninteractive tzdatamysql_tzinfo_to_sql /usr/share/zoneinfo | mysql -u root mysql -psudo systemctl restart nginx mariadbStep 6. Downloading LibreNMS on Ubuntu 22.04/20.04
LibreNMS files are not present to download using the repository of Ubuntu, hence let’s clone it using Git directly from its GitHub repository.
cd /optsudo git clone https://github.com/librenms/librenms.gitStep 7. Adding a LibreNMS User
Let’s create a dedicated user that can only access the files of Librenms
sudo useradd librenms -d /opt/librenms -M -r -s "$(which bash)" Set permissions for downloaded files:
sudo chown -R librenms:librenms /opt/librenmssudo chmod 771 /opt/librenmssudo setfacl -d -m g::rwx /opt/librenms/rrd /opt/librenms/logs /opt/librenms/bootstrap/cache/ /opt/librenms/storage/sudo setfacl -R -m g::rwx /opt/librenms/rrd /opt/librenms/logs /opt/librenms/bootstrap/cache/ /opt/librenms/storage/Step 8: Installing LibreNMS on Ubuntu 22.04 | 20.04
Switch to LibreNMS created user and then install the PHP dependencies required by this network monitoring platform.
sudo -u librenms bashcd./scripts/composer_wrapper.php install --no-devexitStep 9. Configure PHP-FPM for LibreNMS installation
Create a PHP FPM configuration file for LibreNMS by copying the existing configuration file:
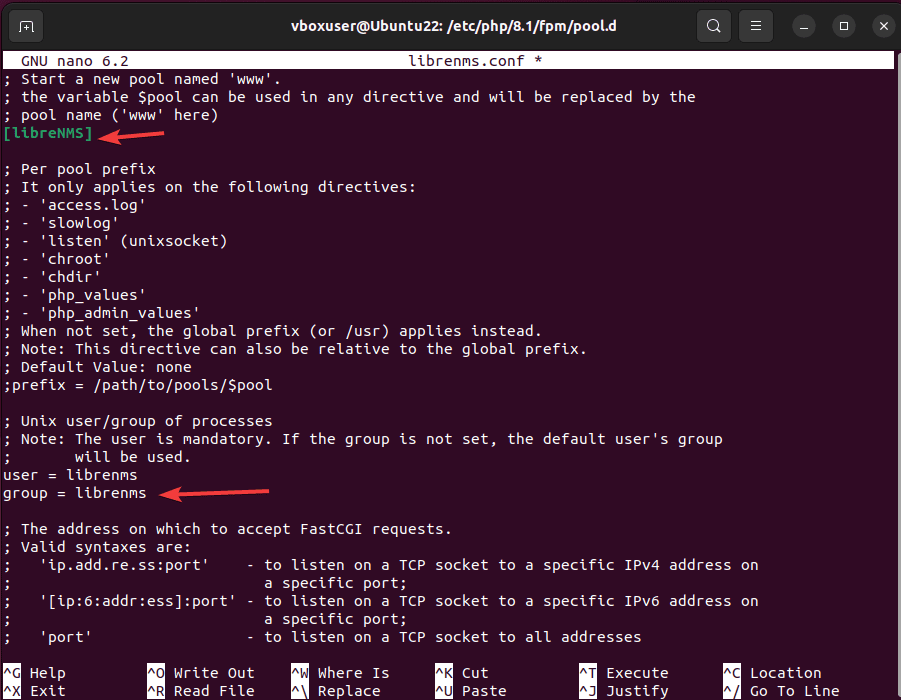
cd /etc/php/*/fpm/pool.d/sudo cp www.conf librenms.confNow, edit the copied file
sudo nano librenms.confReplace [www] to [librenms]
Change user and group from data-www to librenms
user = librenms
group = librenms
Scroll down and also update listen to libreNMS socket.
listen = /run/php-fpm-librenms.sockSave the file – Ctrl + O, press Enter and exit- Ctrl + X.
Come back to your root directory.
cdStep 10: Configuring SNMPd for LibreNMS
If you don’t want to enable SNMP support then you can skip this step for right now…
sudo cp /opt/librenms/snmpd.conf.example /etc/snmp/snmpd.confsudo nano /etc/snmp/snmpd.confChange RANDOMSTRINGGOESHERE to whatever SNMP community String you want to use and then Save the file.
sudo curl -o /usr/bin/distro https://raw.githubusercontent.com/librenms/librenms-agent/master/snmp/distrosudo chmod +x /usr/bin/distrosudo systemctl enable snmpdsudo systemctl restart snmpdStep 11. Create Cron job
If you won’t set the Cron job then while validating you will see the following two errors:
FAIL: Python wrapper cron entry is not present and FAIL: No active polling method detected
So, follow the given commands
sudo cp /opt/librenms/dist/librenms.cron /etc/cron.d/librenmsEdit the cron job file to customize the timing and tasks to be executed. You can use a text editor like Nano or vi:
sudo nano /etc/cron.d/librenmsModify the file as needed to define the tasks you want LibreNMS to run at specific intervals. For example, here’s an example of a cron job that runs LibreNMS polling every five minutes:
Just at the end of the file add the following line:
*/5 * * * * librenms /opt/librenms/poller.php -h all >> /dev/null 2>&1Note: The above entry runs the poller.php script every 5 minutes, polling all devices, and redirects the output to /dev/null to discard it.
Save the file & exit the text editor using Ctrl+O and hit the Enter key.
Restart the cron service to apply the changes:
sudo systemctl restart cronEnable the scheduler
sudo cp /opt/librenms/dist/librenms-scheduler.service /opt/librenms/dist/librenms-scheduler.timer /etc/systemd/system/sudo systemctl enable librenms-scheduler.timer
sudo systemctl start librenms-scheduler.timerCopy Logrotate config
To make sure the LibreNMS logs not get too large, enable log rotating:
sudo cp /opt/librenms/misc/librenms.logrotate /etc/logrotate.d/librenmsA few other things need to be done:
Create Global lnms shortcut:
sudo ln -s /opt/librenms/lnms /usr/local/bin/lnmsEnable Bash completion for lnms command:
sudo cp /opt/librenms/misc/lnms-completion.bash /etc/bash_completion.d/Step 12. Creating a Virtual Host Configuration
If you have installed the Apache web server in the beginning then use that otherwise go for the Nginx host configuration file:
Note: Use only one webserver configuration according to the one you have installed:
For Nginx web server users (only)
If you are using Nginx then create the website configuration file using the given commands:
sudo nano /etc/nginx/conf.d/librenms.confAdd the following lines:
Note: Replace – librenms.example.com; with the domain name you want to use:
server {
 listen      80;
 server_name librenms.example.com;
 root        /opt/librenms/html;
 index       index.php;

 charset utf-8;
 gzip on;
 gzip_types text/css application/javascript text/javascript application/x-javascript image/svg+xml text/plain text/xsd text/xsl text/xml image/x-icon;
 location / {
  try_files $uri $uri/ /index.php?$query_string;
 }
 location ~ [^/]\.php(/|$) {
  fastcgi_pass unix:/run/php-fpm-librenms.sock;
  fastcgi_split_path_info ^(.+\.php)(/.+)$;
  include fastcgi.conf;
 }
 location ~ /\.(?!well-known).* {
  deny all;
 }
}
Save the file by pressing Ctrl+X, type Y, and hit the Enter key.
Delete the default test page of Nginx and restart the web server
rm /etc/nginx/sites-enabled/defaultsystemctl restart nginx
systemctl restart php8.1-fpmFor Apache web server users (only):
To access the LibreNMS web interface we need to tell our Apache server where the files of it are located. For that, we create a virtual host configuration file:
sudo nano /etc/apache2/sites-available/librenms.confAdd the following lines:
Note: Replace the Server name with your IP-address or fully qualified domain name such as librenms.your-domain.com
<VirtualHost *:80>
  DocumentRoot /opt/librenms/html/
  ServerName  librenms.example.com

  AllowEncodedSlashes NoDecode
  <Directory "/opt/librenms/html/">
    Require all granted
    AllowOverride All
    Options FollowSymLinks MultiViews
  </Directory>

  # Enable http authorization headers
  <IfModule setenvif_module>
    SetEnvIfNoCase ^Authorization$ "(.+)" HTTP_AUTHORIZATION=$1
  </IfModule>

  <FilesMatch ".+\.php$">
    SetHandler "proxy:unix:/run/php-fpm-librenms.sock|fcgi://localhost"
  </FilesMatch>
</VirtualHost>
Save the file by pressing Ctrl + O, press Enter key, and Ctrl+X to exit.
Disable the default site and enable the newly created one
sudo a2dissite 000-default
sudo a2enmod proxy_fcgi setenvif rewrite
sudo a2ensite librenms.conf
Restart services:
sudo systemctl restart apache2
sudo systemctl restart php*-fpm
Step 13. Accessing the LibreNMS Web Interface
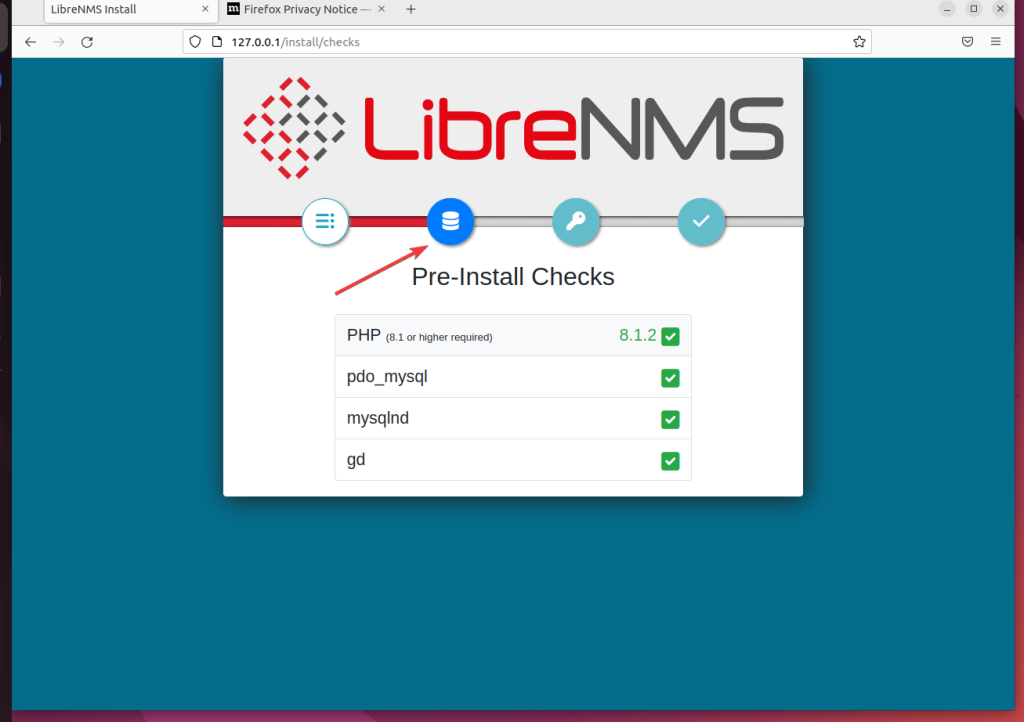
Once the Configuration of LibreNMS is completed, go to your system browser and point it to the server IP address or domain name you have used.
For example- http://server-ip-address or http://your-domain.com
First, the installation setup will check for the dependencies required by the software.
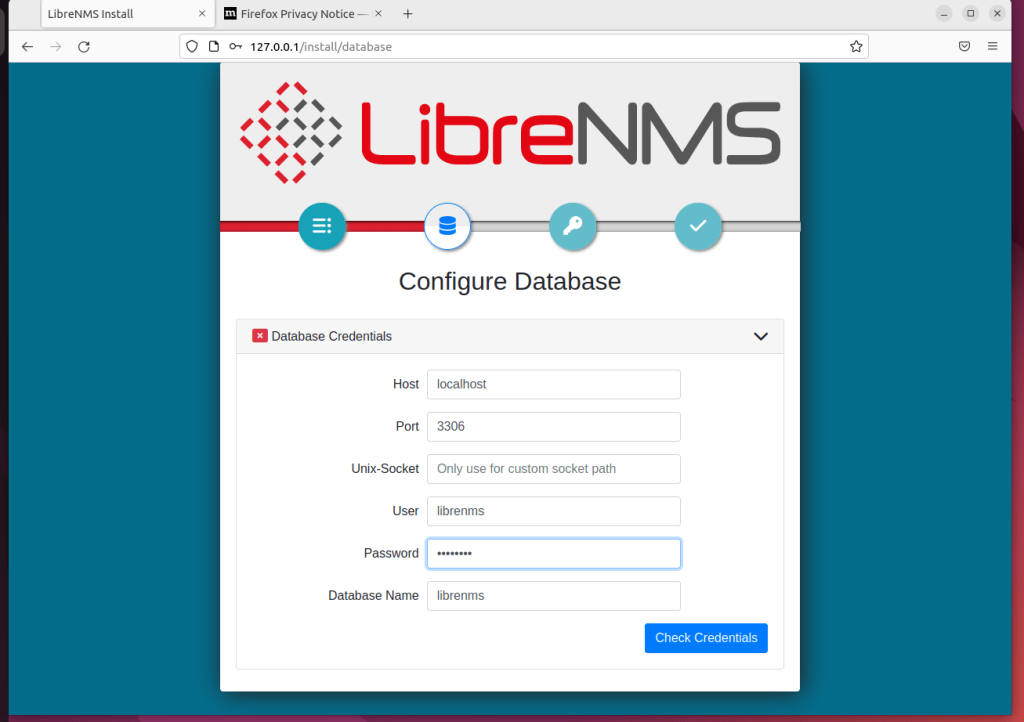
Furnish the details of the MariaDB database you have created in Step 5 of this article.
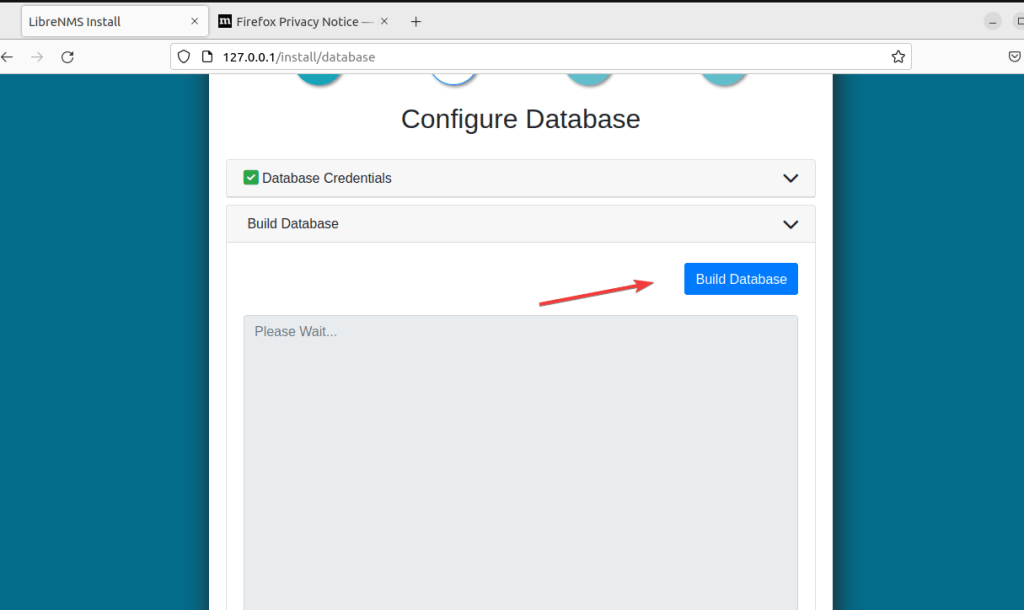
After connecting to the Database, click on the “Build Database” button.
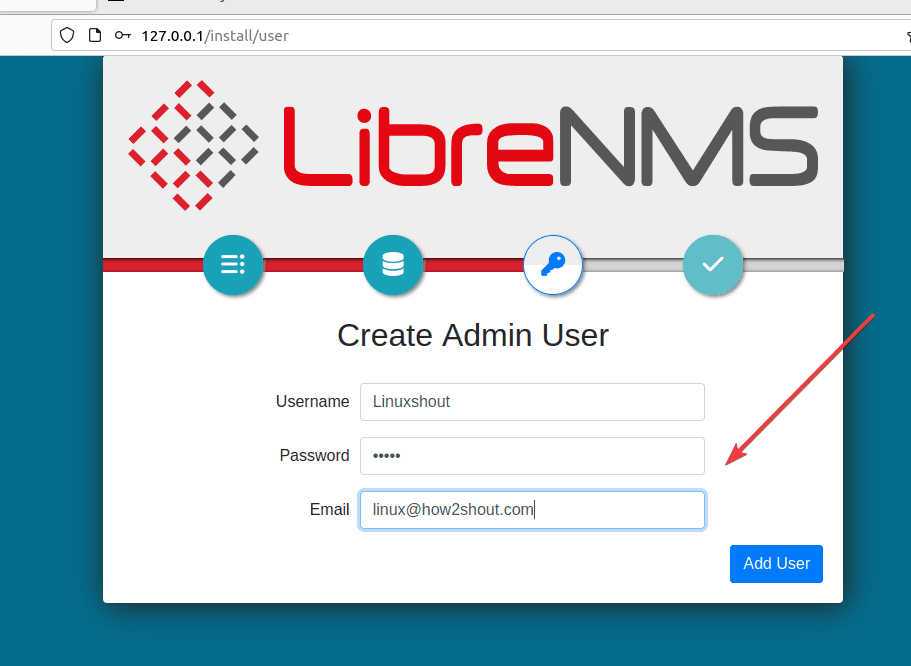
Create an Admin user to log in to the backend of LibreNMS.
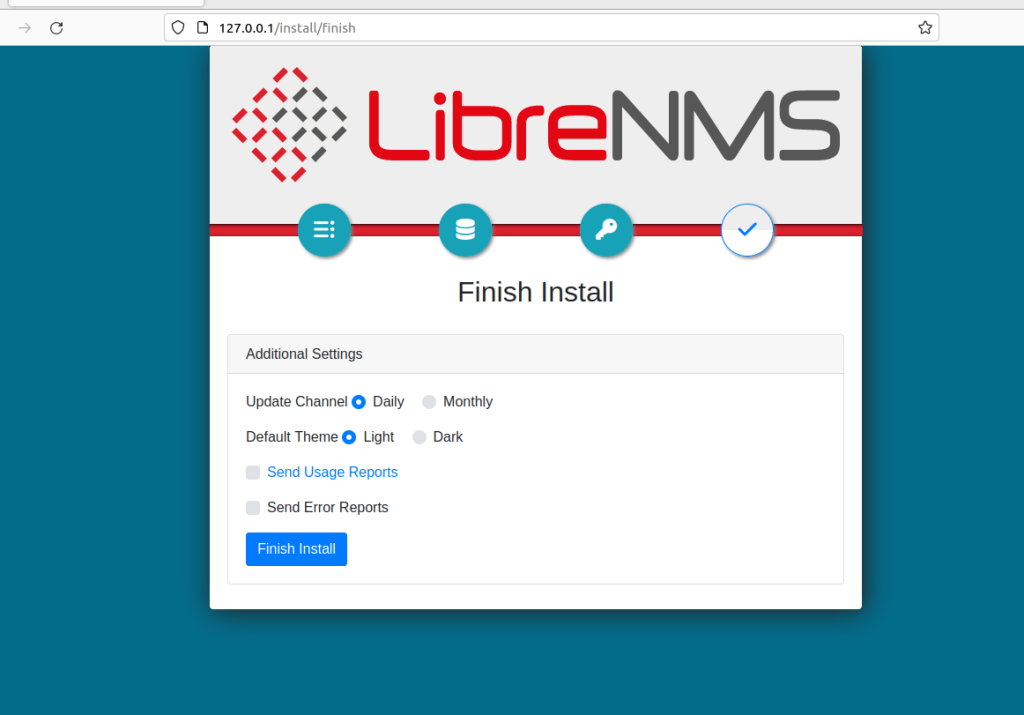
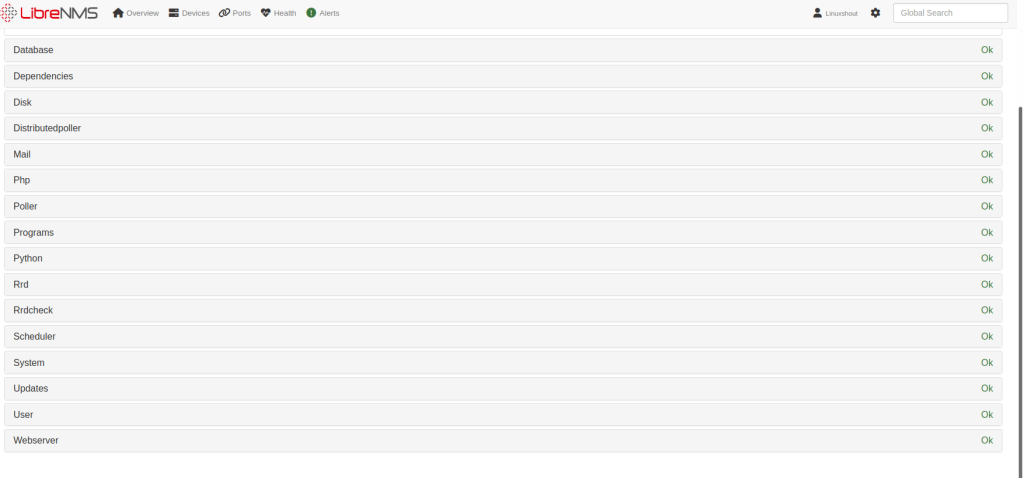
LibreNMS will validate and let you know if there are some improvements or warnings are there for your installation.
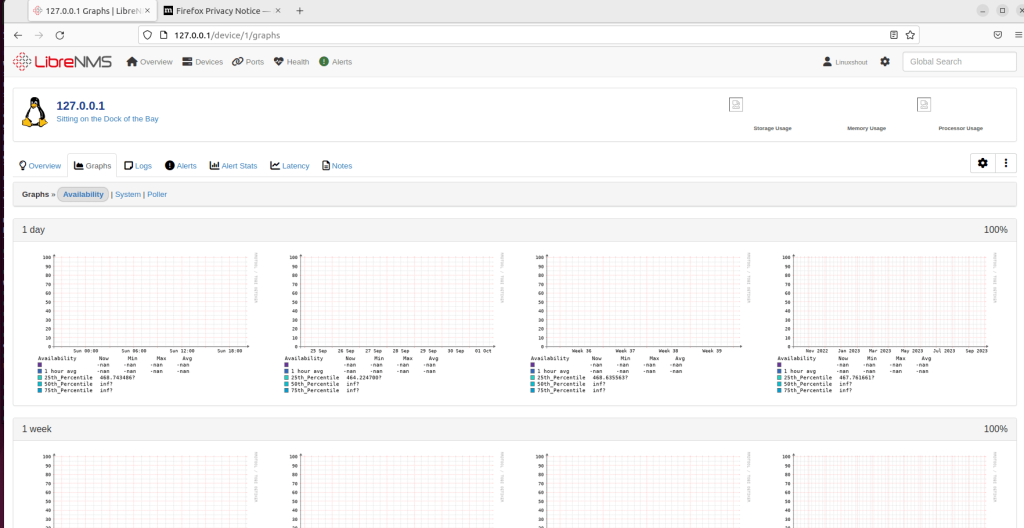
Finally, you will have the LibreNMS Dashboard to start monitoring your network and devices.
Know further how to add devices and deal with LibreNMS from its official documentation.
Other Articles:


