In today’s fast-paced business environment, efficient management of enterprise resources is crucial for success. Enterprise Resource Planning (ERP) systems like ERPNext play a pivotal role in streamlining operations, managing data, and enhancing productivity. If you’re considering installing ERPNext on your Ubuntu Linux server for efficient business management then you are at the right place.
In this step-by-step tutorial, we will jot down the important steps need to follow for the successful installation of ERPNext on your Ubuntu 22.04 system.
What do we need?
Before following the steps of the installation ensure you have all the necessary prerequisites in place:
1. A clean LTS Ubuntu server installation is recommended.
2. Terminal Access to your server via SSH or direct terminal access.
3. Root Access for system-level operations.
4. Internet Connection for downloading packages during the installation process.
Note: This tutorial is not just limited to Ubuntu 22.04 Focal Foss, even can be used for Debian, Ubuntu 20.04, and other similar operating systems.
Step 1: Update Ubuntu 22.04 Server
It will be a good practice if you run the system update command on our Linux before installing some new package after some time. It is not only going to install the latest available updates for your system packages but even refresh the APT index cache.
sudo apt update && sudo apt upgradeStep 2: Create a dedicated user for EPRNext
Instead of using our current sudo user for installing EPRNext, let’s create a separate one with sudo rights. Don’t worry we will remove the sudo rights from it later to make our system more secure.
Create user:
sudo useradd -m erpnext -s /bin/bashsudo usermod -aG sudo erpnextAssign some password to make the account secure:
sudo passwd erpnextLogin using ERPNext user and run system update:
sudo su - erpnextsudo apt update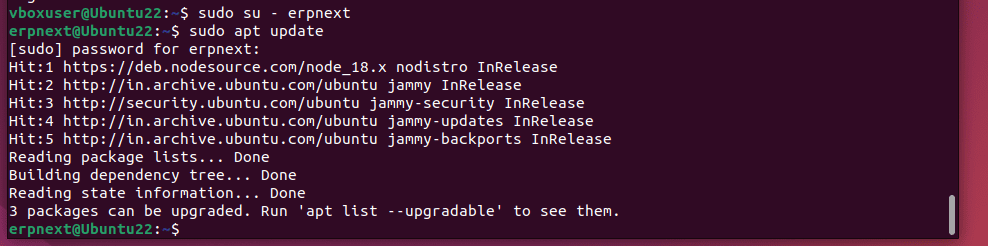
Step 3: Install Required Dependencies
For installing ERPNext on Ubuntu we need to install several dependencies so that we won’t face any common package-related problems later. Here is the command that you need to run in your terminal:
sudo apt install python3-minimal build-essential python3-setuptools python3-pip python3-dev libffi-dev libssl-dev ca-certificates curl gnupg xvfb libfontconfig wkhtmltopdf libmysqlclient-dev software-properties-common python3.10-venv supervisorStep 4: Setup MariaDB Database Server
MariaDB is an open-source SQL database server that we can install directly using the default system repository of Ubuntu. We need it to store the data generated by the ERPNext.
sudo apt install mariadb-server mariadb-clientSecure your installation by running and following the text-based wizard offered by the given command:
sudo mysql_secure_installationHere are a few questions the above command will ask to answer…
Switch to unix_socket authentication [Y/n] y
Change the root password? [Y/n]: Y
Remove anonymous users? [Y/n] y
Disallow root login remotely? [Y/n] y
Remove the test database and access to it? [Y/n] y
Reload privilege tables now? [Y/n] y
Edit MYSQL default config file
sudo nano /etc/mysql/my.cnfScroll to the end of the file and add the following block of code exactly as is:
[mysqld]
character-set-client-handshake = FALSE
character-set-server = utf8mb4
collation-server = utf8mb4_unicode_ci

[mysql]
default-character-set = utf8mb4
Save the file using Ctrl+X, then type Y and hit the Enter key.
Step 5: Install Redis Server for ERPNext
For caching and task queue management also install the Redis server on Ubuntu for your ERPNext.
sudo apt install redis-serverStep 6: Install Node.js and Yarn
ERPNext uses Node.js for its front end. Therefore, to get the latest LTS version of the Nodejs add its repository manually using the commands on your Ubuntu system.
Add the Node GPG key:
sudo mkdir -p /etc/apt/keyringscurl -fsSL https://deb.nodesource.com/gpgkey/nodesource-repo.gpg.key | sudo gpg --dearmor -o /etc/apt/keyrings/nodesource.gpgAdd Node APT repository:
Here we are installing the Node LTS 18 version, you can go for 16 or 20, if needed by simply changing the – NODE_MAJOR= version number, with the one you require.
NODE_MAJOR=18
echo "deb [arch=amd64 signed-by=/etc/apt/keyrings/nodesource.gpg] https://deb.nodesource.com/node_$NODE_MAJOR.x nodistro main" | sudo tee /etc/apt/sources.list.d/nodesource.list
Run the system update:
sudo apt updateAfter adding the repo, we can install the Nodejs:
sudo apt install nodejsUse the Node package manager NPM and also install YARN:
sudo npm install -g yarnStep 7: Get Frappe Bench
Now, we’ll install Frappe Bench, which is a command-line tool to manage ERPNext installations:
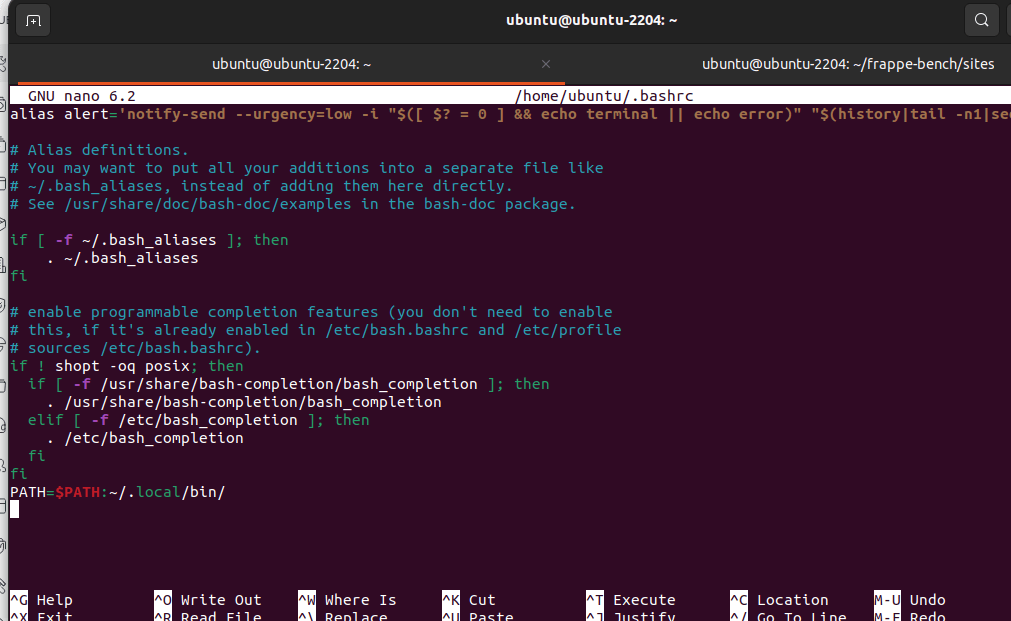
pip3 install --user frappe-benchAdd Bench to your path, for that edit the Bashrc file:
nano ~/.bashrcScroll down and add the following line at the end of the file as shown in the screenshot as well:
PATH=$PATH:~/.local/bin/Save and Close the file using the Ctrl+X, Y, and then hit the Enter key.
Now, run:
source ~/.bashrcInitialize Frappe Bench
We can access the Bench now from anywhere in our Terminal, so initialize it. Here we are going for version 14 which was the latest one while doing this article, you can choose accordingly when you are performing this tutorial. Just need to replace the 14 with the version you want to use.
bench init --frappe-branch version-14 frappe-benchSwitch directories into the Frappe Bench directory
cd frappe-benchChange user directory permissions
This will give the bench user execution permission to the home directory.
chmod -R o+rx /home/[your-user]For example, we have created “erpnext” as our user at the beginning of this tutorial, so we use that. If you are using some other then replace [your-user] with that in the above command.
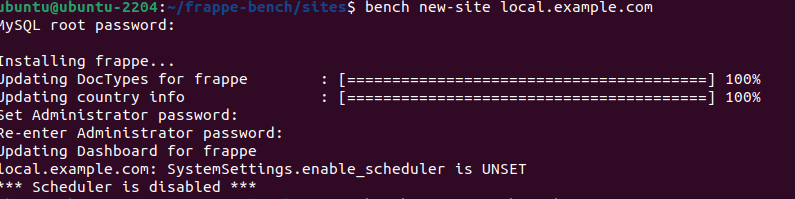
Create a site that you want to use for ERPnext:
Let’s say we have a domain – local.example.com and want to use it for accessing our ERPnext website. So, create a site using that, here is an example:
bench new-site [your-site-name]example:
bench new-site local.example.comAs you run the above command, it will ask for your MYSQL root password to create a database. Also, here set a password for your ERPNext Website Admin account which we need later to access its Dashboard.
Step 8: Installing ERPNext on Ubuntu 22.04 LTS
Let’s download ERPNext app to install on our system along with some other important apps that you may require as well to use ERPNext in production.
To get the Version 14 of ERPNext:
bench get-app --branch version-14 erpnext—————————————————-(optional) Extra info————————————————————–
Those who are getting this error: supervisorctl restart frappe: frappe: ERROR (no such group)
They can run this command:
The below commands will create supervisor.conf file under your ~/frappe-bench/config directory.
cd ~/frappe-benchbench setup supervisorNow create a required symlink.
sudo ln -s ~/frappe-bench/config/supervisor.conf /etc/supervisor/conf.d/frappe-bench.confTo restart all Frappe services, just restart your Supervisor:
sudo service supervisor restart———————————————————-end here——————————————————–
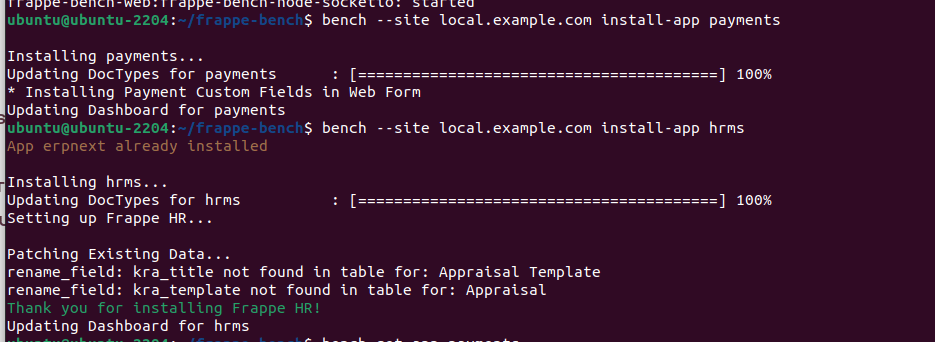
Similary, those who want HRMS and Payments apps to enable extra funtions in their ERPnext instance can get them as well:
bench get-app paymentsbench get-app hrms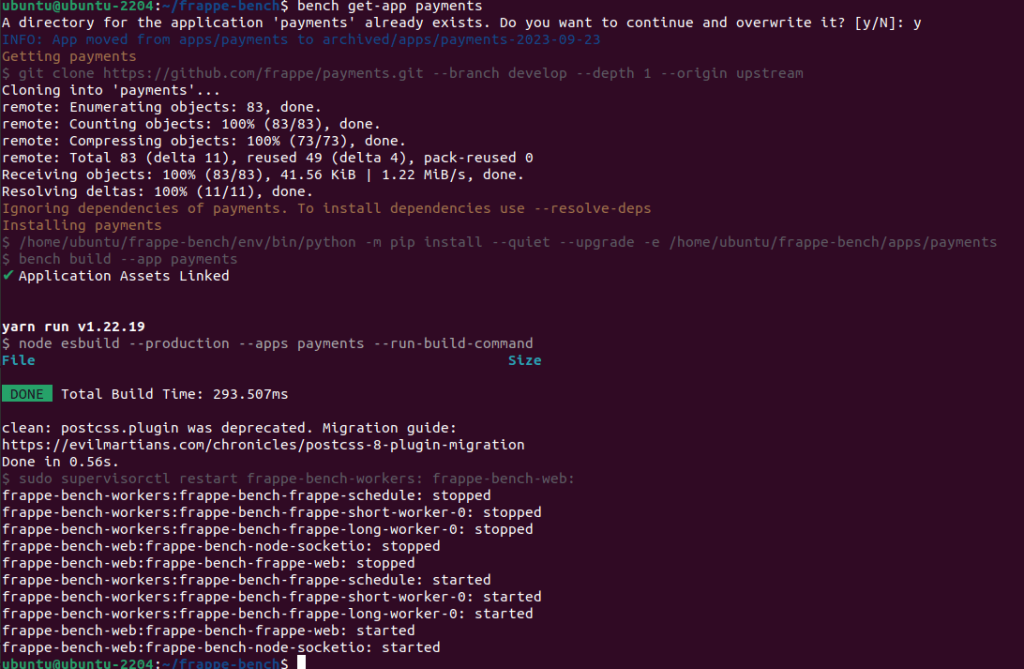
Now, Install the apps we have downloaded using the bench command, which is – erpnext, hrm and payment. The commands for that is:
Note: Repalce [your-site-name] with the one you have created in the Step 7 of this article. For example, here we are using local.example.com.
bench --site [your-site-name] install-app erpnextbench --site [your-site-name] install-app hrmsbench --site [your-site-name] install-app paymentsSimilarly, you can also install the other apps available for ERPnext or Frappe.
Step 9: Start Bench to test ERPnext website
We have installed and created the ERPNext website on Ubuntu succesfully. Let’s check wether it is working or not. In your terminal run:
bench startThe above command will start the developing server to test your website. You will see the local Ip-address where your ERPNext website is running. By default it will be on port number 8000, however, if it is not available or occupied by some other app then it can be different.

Open your web browser and point to the Ip-address as shown in the development server’s terminal output:
In case you get 404 error while access the website then check out the next step to solve it. Becuase we got that:

Error: Getting 404 not found on bench start in browser
So, how to solve this error. First, stop the Bench running server using Ctrl+C in the terminal where its process is still active.
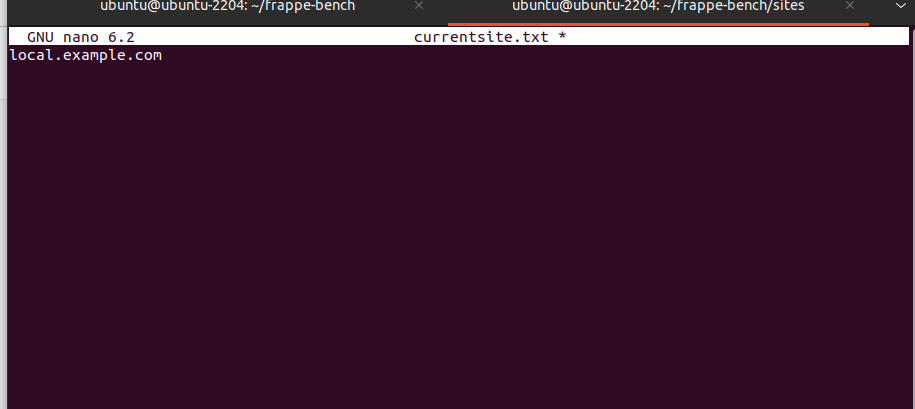
After that we have to switch to Sites directory and create a file, let’s see how?
cd ~/frappe-bench/sitesCreate a currentsite.txt file:
nano currentsite.txtAdd your current website name in it, that you have used for ERPNext. To save the file press Ctrl+X and then Y followed by Enter key. For example, we have created a site with the name – local.example.com, so we just have added that.
Check the file is available there now:
ls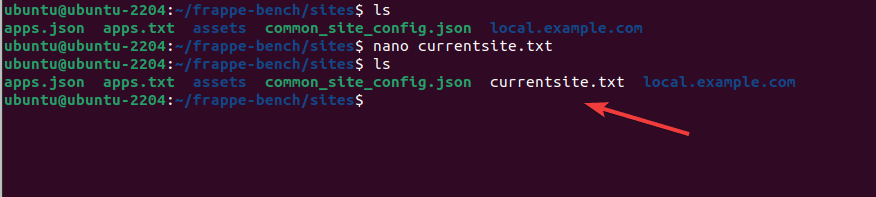
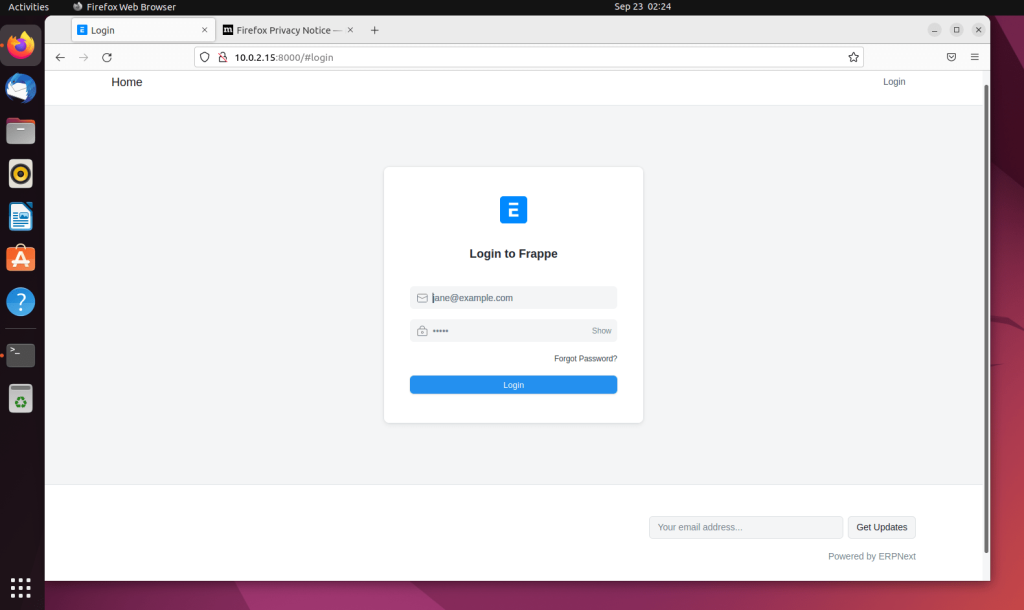
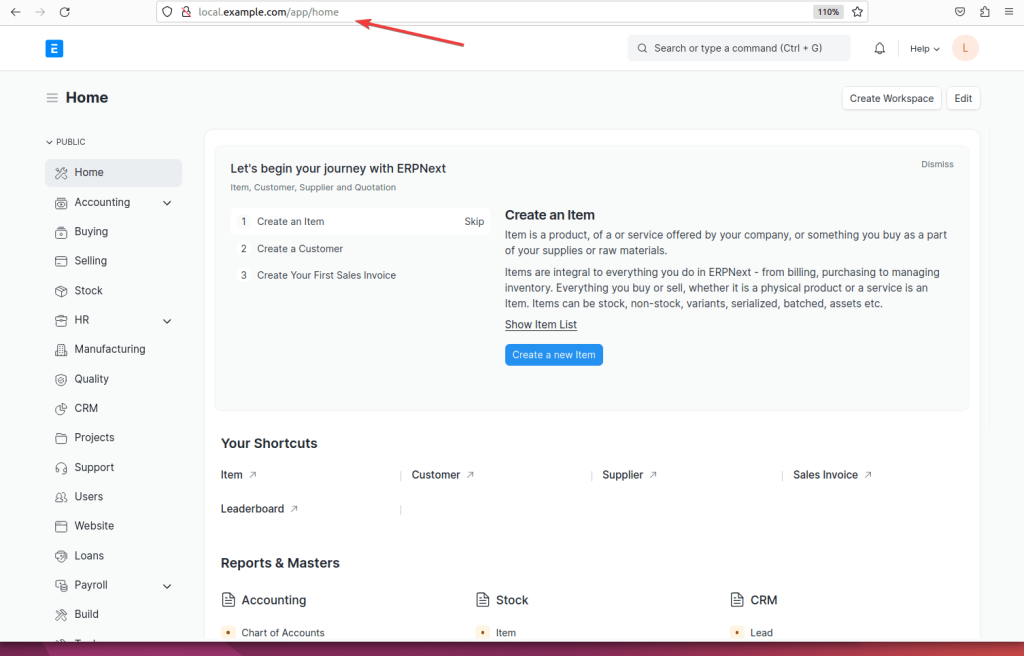
Now, again run bench start in your terminal and after that open your browser and point to the local IP address along with the port. This time you will see the login interface as shown in the given screenshot.
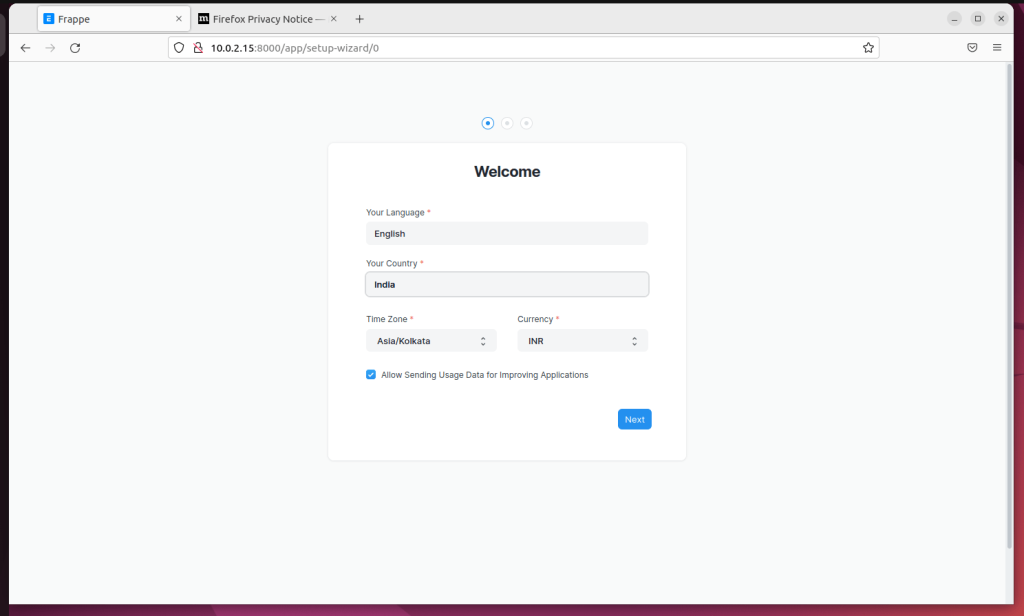
Once you have the login interface, you can use the username – administrator whereas the password for it is the one you have set in Step 7 while creating your ERPNext site.
After that, the setup will also ask you to set the Language for Dashboard along with other common information.
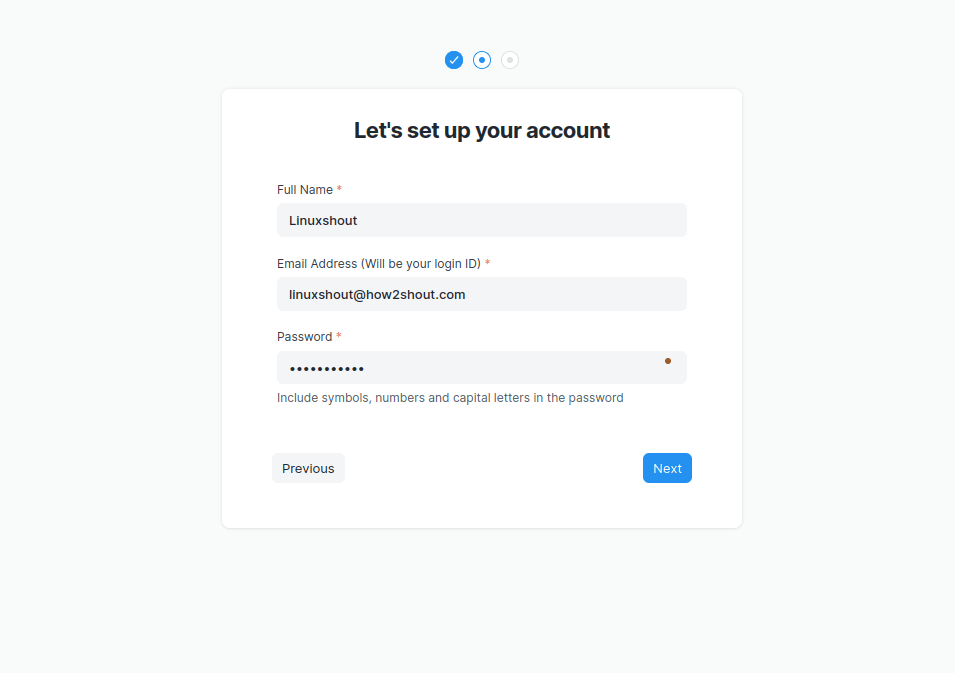
Apart from the Admin, in this step you can create one more user to access the ERPNext Dashboard and other settings.
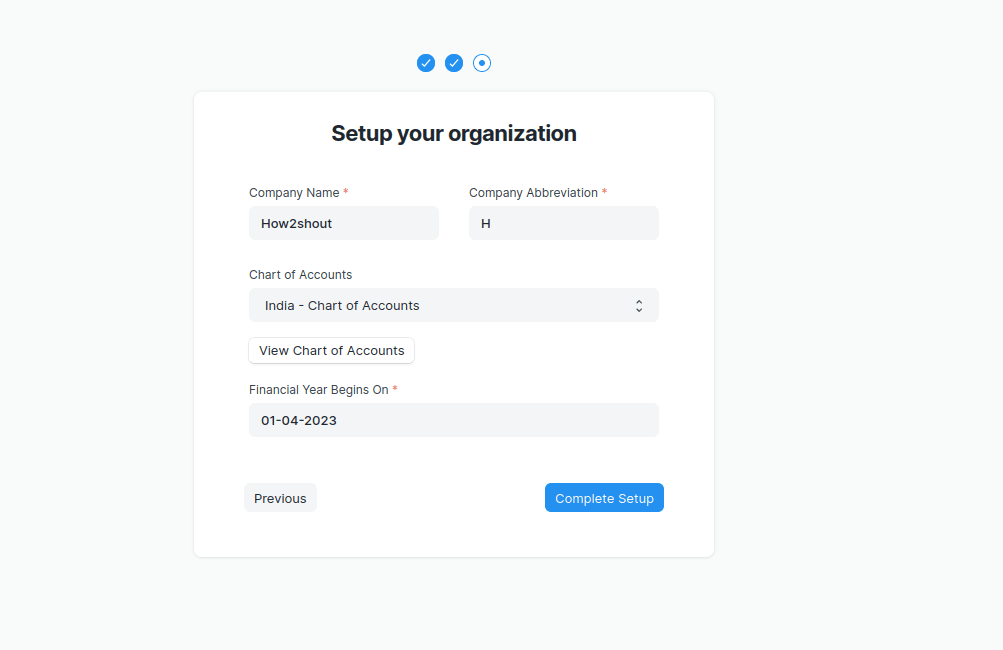
Setup Organization by providing the requried details.
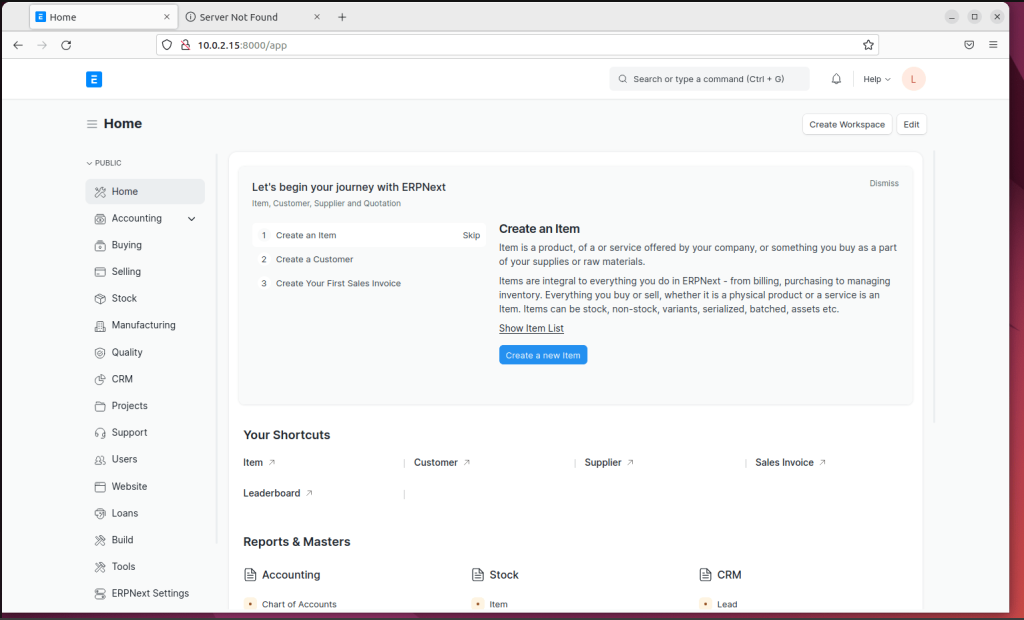
Finally, the ERPNext Dashboard running on your Ubuntu 22.04 will be in front of your eyes.
Now, once you have configured the ERPNext as per your requirement let’s shutdown the Bench’s developing server to make our EPRNext live for production use.
Go to your Terminal where the “bench start” process is still active and press Ctrl+X keys on your keyboard.
Step 10: Setup ERPNext for Production
So, far in the previous step, we have seen we were accessing the ErpNext in browser using the local server ip-address but with a specific port number. However, in the production environment, you definitely want to use some domain without adding any particular port number. Let’s see how to do that.
In your Temrinal first
- Enable Scheduler
bench --site [your-site-name] enable-scheduler- Disable maintenance mode
bench --site [your-site-name] set-maintenance-mode off- Setup Supervisor:
Although we already have discussed how to setup a supervisor in Step 8 of this article, if, you have not followed that then here are the commands for that again:
cd ~/frapper-benchbench setup supervisorsudo ln -s `pwd`/config/supervisor.conf /etc/supervisor/conf.d/frappe-bench.conf- Install Nginx and configure for Bench
Need Nginx as a proxy server to use HTTP port 80 instead of 8000 for accessing ERPNext Dashboard.
sudo apt install nginxUse Bench to configure your website for port 80 automatically.
bench setup nginxCopy frappe generated Nginx configuration file to Nginx main directory:
sudo ln -s `pwd`/config/nginx.conf /etc/nginx/conf.d/frappe-bench.conf- Disable the Default test page
sudo unlink /etc/nginx/sites-enabled/defaultsudo unlink /etc/nginx/sites-available/default- Restart Nginx to apply the changes
sudo systemctl restart nginx(optional) If you get an error in return that is:
Job for nginx.service failed because the control process exited with error code.
See "systemctl status nginx.service" and "journalctl -xeu nginx.service" for details.
As we got above the error while setting up the Nginx to access ERPNext, that’s why we are discussing it here. If this is in your case then as well, first edit the Ngnix configuration file:
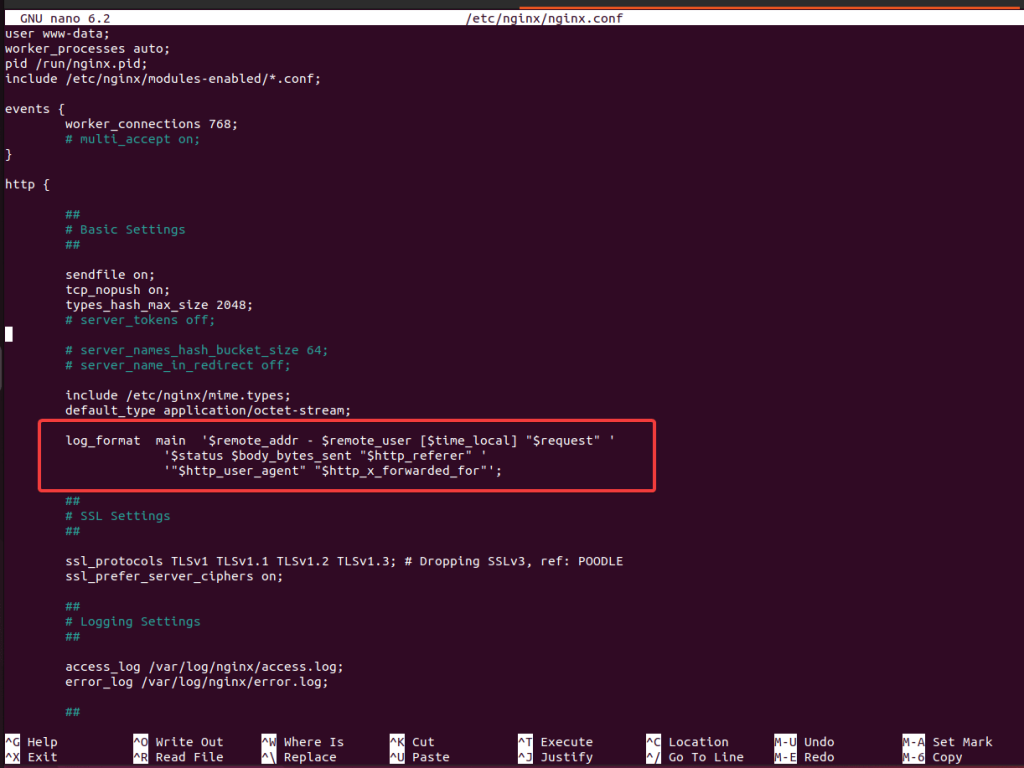
sudo nano /etc/nginx/nginx.confNow anywhere between http {} section add the following lines:
log_format  main  '$remote_addr - $remote_user [$time_local] "$request" '
                      '$status $body_bytes_sent "$http_referer" '
                      '"$http_user_agent" "$http_x_forwarded_for"';
To get an idea refer to the given screenshot:
Save the file using Ctlr+X. then Y and pressing the Enter key. Now again try to restart Nginx and this time you will not face the error:
sudo systemctl restart nginxNow, use either your server IP address or domain to access the ERPNext Dashboard. You will have it without using any additional port such as 8000.
http://your-domain.com or http://sever-ip-address
Note: Upon accessing the ERPNext, If you get some error like below:
Sorry!
We will be back soon.

Don’t panic. It’s not you, it’s us.
Most likely, our engineers are updating the code, and it should take a minute for the new code to load into memory.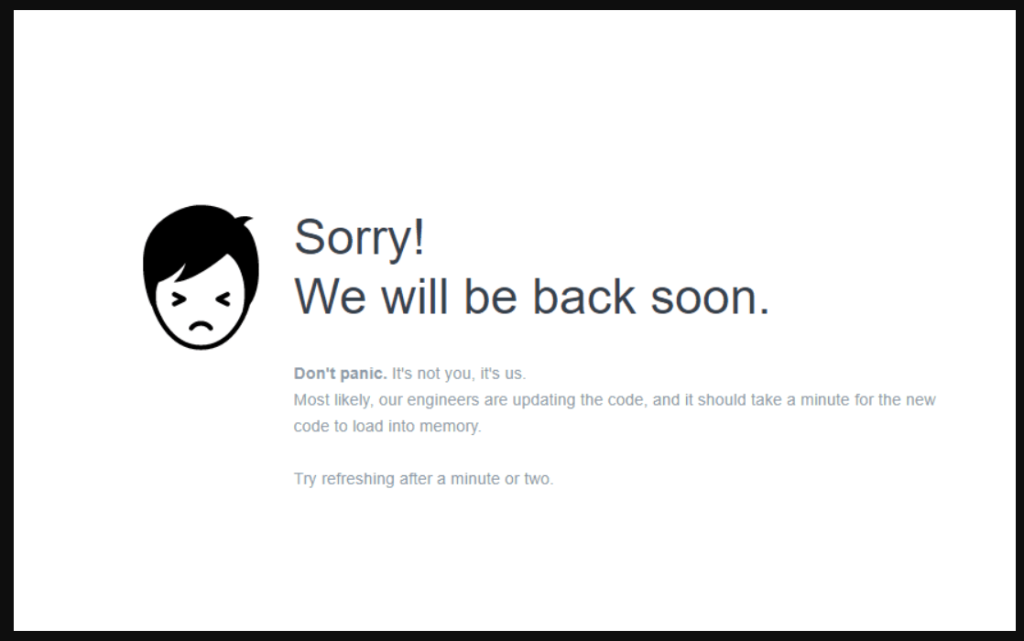
To solve, restart Supervisor service:
sudo systemctl restart supervisor.serviceNow, check it is working fine:
systemctl status supervisor --no-page -lAfter that, refresh your browser’s page where you are accessing the ERPNext Dashboard.
Additional information:
If you want to use the ERPNext with some local domain created to use within your local PC then point it in your /etc/hosts file to 127.0.0.1. To make things easy you can just run the given command to achieve this:
bench --site [your-site-name] add-to-hostsFor example, we have a locally created domain which was also the name of our ERPnext site, here in this tutorial that is: local.example.com. So, to use it for accessing the Dashboard of ERPnext only in our local network or PC, we can use the given command:
bench --site local.example.com add-to-hostsHow to update Bench:
Later to update the bench and its other components, use the given command. It pulls changes for bench-repo and all apps, applies patches, builds JS and CSS, and then migrates.
bench update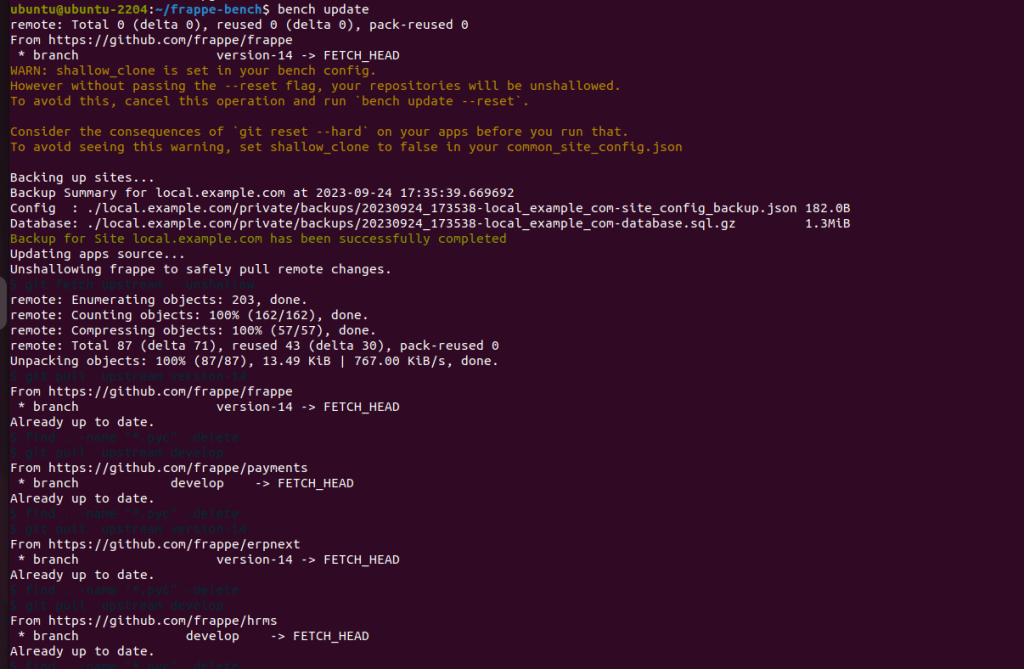
Those who later want to remove the sudo rights from their ERPNext user can run the given command:
sudo usermod -G "" erpnextEnding note:
So, this was the tutorial in which we not only tried to cover the installation of ERPNext on the Ubuntu server in detail but also the solutions to problems we faced while setting it up. In case you want some more info, can see the the official documentation.


Thx for excellent guide. I was facing another issue:
For key collation_server. Expected value utf8mb4_unicode_ci, found value utf8mb4_general_ci
Solution:
SET GLOBAL collation_server = ‘utf8mb4_unicode_ci’;
I think that Frappe is VERY fragile. Couldn’t go till the end.
erpnext@biuro:~/frappe-bench$ bench start
transforming (435) node_modules/frappe-ui/src/components/TextEditor/commands.js
Killed
error Command failed with exit code 137.
info Visit https://yarnpkg.com/en/docs/cli/run for documentation about this command.
error Command failed with exit code 137.
info Visit https://yarnpkg.com/en/docs/cli/run for documentation about this command.
22:04:48 system | socketio.1 started (pid=4255)
22:04:48 system | web.1 started (pid=4251)
22:04:48 system | redis_cache.1 started (pid=4252)
22:04:48 system | redis_queue.1 started (pid=4253)
22:04:48 system | schedule.1 started (pid=4258)
22:04:48 system | worker.1 started (pid=4259)
22:04:48 worker.1 | /bin/sh: 1: cannot create logs/worker.log: Permission denied
Anyways, MANY thx for sharing it
When running the command sudo mysql_secure_installation
I got some error when entering the none password by pressing return, and had to reboot the server and run this command again to finish the installation.
Hi
Permission denied is the same issue for me too.
Can you please provide any help?
This is an excellent straight forward guide. Thanks for that.