Tutorial to learn the steps involve in the installation of Jupyter Notebook on Ubuntu 22.04 Jammy JellyFish using the command terminal.
What is Jupyter Notebook?
The Jupyter Project is a non-profit initiative that aims to develop and provide open-source software and open standards for interactive work. One of the most famous products of the project is Jupyter Notebook. It is software for sharing and creating interactive worksheets that work on the client-server principle. In a Jupyter Notebook, numbers, text, graphics, and executable program code can be combined and made available to users. Other products include JupyterLab, JupyterHub, and Voilà.
The Jupyter project originated in 2014 as a spin-off of the iPython project. The name Jupyter is composed of the first letters of the programming languages Julia, Python, and R. Jupyter also supports numerous other languages such as C++, Ruby, Haskell, PHP, Java, and many others via so-called kernels. The user accesses a notebook on a Jupyter Notebook server via a web browser and can interact with the data and information. The format of the Jupyter Notebooks is the JSON (JavaScript Object Notation) format. It allows cross-functional collaboration.
Steps to install Jupyter Notebook on Ubuntu 22.04
1. Jupyter System Requirements
To perform this tutorial we need Ubuntu or its based Linux systems with a non-root sudo access user and Python environment.
2. Update Ubuntu 22.04 Linux
Before moving further, first perform the system update that will rebuild the APT package manager cache.
sudo apt update && sudo apt upgrade3. Install Python3 & PIP3
The latest version of Python is 3, available to install via the official repository of Ubuntu 22.04. Because we need a Python environment to install and use Jupyter Notebook. Therefore, first, install it.
sudo apt install python3Also, we need a PIP package manager to install Jupyter Notebook, hence get that as well.
sudo apt install python3-pip4. Install virtualenv
Once the above-given commands are completed, both Python3 and PIP3 will be on your system. Although we can install Jupyter without creating a virtual Python environment, however it is a good idea to isolate our project using it, hence install virtualenv package, a tool for creating isolated virtual Python environments.
sudo apt install python3-virtualenv5. Create a Python virtual environment for Jupyter
Instead of installing Jupyter globally, let’s create an isolated Python environment for it. Therefore, here we are creating our project directory called – demo you can name the folder whatever you want.
mkdir demoCreate a new Virtual environment inside the folder.
cd demoLet’s give it a name- notebookenv, of course, you can assign a name whatever you want.
virtualenv notebookenvNow, activate and load the created Python environment for your current shell.
source notebookenv/bin/activateYou will see that your bash shell has been switched to your created environment. Now, let’s first switch to upgrade our system’s default PIP version to the latest one.
pip3 install --upgrade pip6. Install Jupyter Notebook on Ubuntu 22.04
Finally, use Python’s PIP package manager to install Jupyter on your Ubuntu Linux for the created environment.
pip3 install jupyter
7. Jupyter Notebook Web interface
Once the installation is completed, execute the given command that will open the web interface on your local browser to access your Jupyter Notebook project.
jupyter notebook
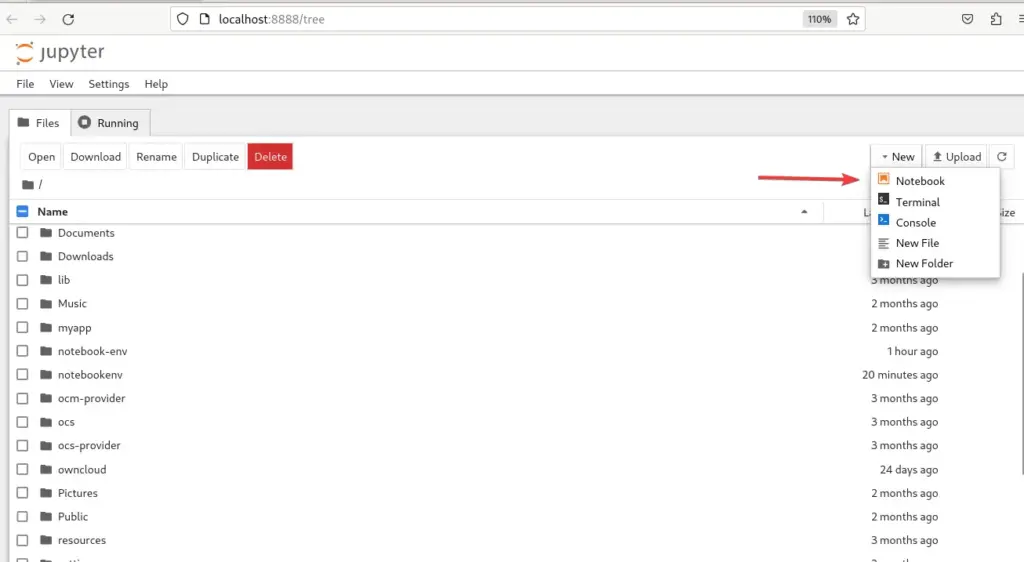
To create a new notebook file, select New > NoteBook given on the right side and start writing your code.

FAQ
Jupyter Notebook is web-based IDE software for sharing and creating interactive worksheets that work on the client-server principle. It supports over 40 programming languages, including Python, R, Julia, and Scala.
No, they are not the same Python is a programming language whereas Jupyter is a web application IDE software that supports multiple coding languages to compile.
Yes, Jupyter is an IDE for software development that supports more than 40 programming languages with a big data integration facility.
No, Jupyter is not only for Python, it is just one of the programming languages it supports out of R, Julia, Scala, and more. However, developers popularly use it for coding in Python which is the reason most people think that it is only for Python language.
Jupyter got its name from the three core programming languages it supports which are Julia, Python, and R. Further, the developers of this platform give their tribute to Galileo’s notebooks that were used by him to note down the findings of Jupiter’s moon.
Other Articles:
• How to install Anaconda Navigator on Ubuntu 20.04 LTS
• Install RPM Packages on Ubuntu 22.04 LTS
• How to install Python 3.x and PIP 3 on Ubuntu 20.04 LTS
• How to Install VidCutter on Ubuntu 22.04


