When it comes to running virtual machines on home Linux systems or for personal use most of us either go for VirtualBox or Vmware workstation player, however, there is more best option i.e KVM/Qemu. Qemu and KVM both are open source platforms for performing virtualization on Linux platforms. KVM stands for Kernel Virtual Machine, where QEMU is an emulator that can also be used as a virtualizer with the help of KVM to provide a native speed by accessing Intel VT-x or AMD V technology of modern processors.
KVM is a virtualization module that can easily be installed in any Linux kernel to allow it to function as a type 1 hypervisor.
Thus, the installation of KVM becomes a lot easier, we only need a Linux-based system such as Ubuntu and a processor with intel-v / VT-x or AMD-v support. All new processors have this instruction set extension. Only the small processors, such as the Atom from Intel, or very old processors may lack this feature.
However, by default to manage KVM virtual machines we need to use the command line, unlike VirtualBox or VMware it will not have a graphical user interface out of the box. Still, we can use various Graphical user interface Virtual Machine Manager applications such as Virt-Manager (Virtual Machine Manager), Gnome Boxes, and more… Here is the list of all such open-source platforms: 8 Best Open-source Virtual machine manager for Linux
Here we will see the installation of the popular Virt-Manager that makes KVM machines easy to operate just like VirtualBox. The special feature of VMM is that it forms a kind of intermediate layer, so that the management of the virtual machines is uniform, regardless of which virtualization solution is used, which reduces the administrative effort. The configuration is stored in XML files so that it can be corrected manually if necessary. We can also use VVM to manage the Virtual machines running on remote servers’ KVM using an encrypted connection.
Install KVM and Virt Virtual Machine Manager GUI on Ubuntu 20.04 LTS
The given steps are also applicable for Ubuntu 18.04, Debian, Linux Mint, MX Linux, Elementary OS, Kali Linux, and other similar Linux distros.
1. Open a command terminal
If you are installing KVM on some Ubuntu server then you already on the command line, whereas GUI desktop users can access the terminal from the All applications area or using the keyboard shortcut Ctrl +ALT +T.
The first thing we perform is the running of the system update command:
sudo apt update
2. Install QEMU/KVM on Ubuntu 20.04 Server
Well, you can install KVM on both Desktop and Server editions of Ubuntu, it is your choice. However, the command for doing it will be the same for both. Nevertheless, for a small office or running multiple virtual machines, it is recommended to use a command-line server that will consume fewer system resources so that your VMs will have more power to work. So, here is the command to setup KVM along with other tools for its proper management and functioning.
sudo apt install qemu-kvm libvirt-daemon-system libvirt-clients bridge-utils
3. Install Virt-Manager GUI for KVM on Linux
Our KVM is already installed, now it’s time to install a Graphical user interface to create, start, stop or delete virtual machines using Virt-Manager.
sudo apt install virt-manager
Once the installation is completed go to Applications and search for Virtual Machine Manager, as its icon appears click to run it.
Note: If your KVM is installed on some CLI server, then install Virt-Manager on some other Linux PC or laptop with GUI. You can also use Virt-Viewer to remotely view VMs on Windows platforms, however, that would not allow you to create a new VM.
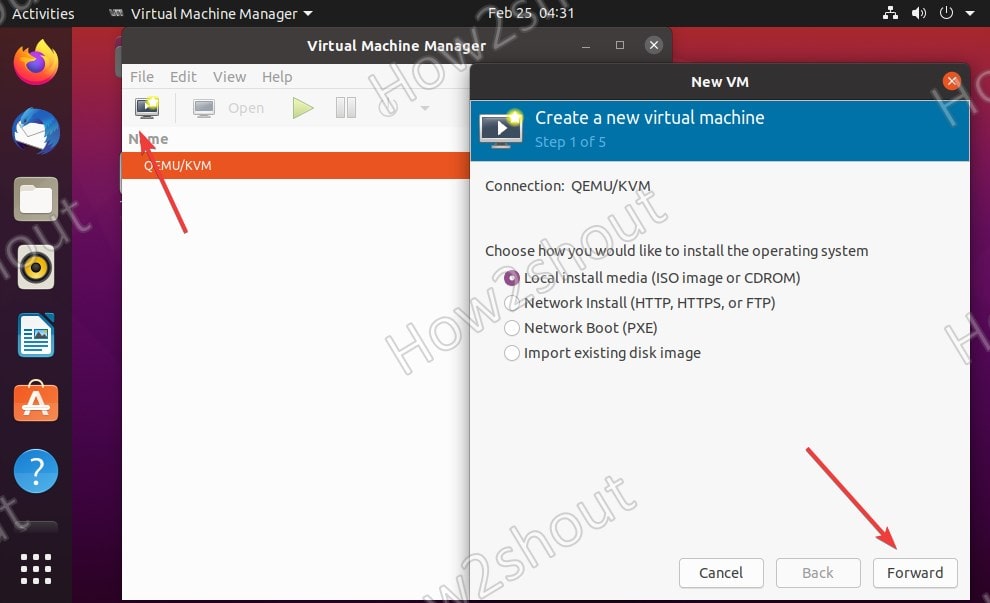
4. Create a New Virtual Machine
To create a new VM, click on the PC icon and then select the source of the operating system you want to install. However, most of the time, it will be the ISO image, thus select the default “Local install media ISO image or CDROM”.
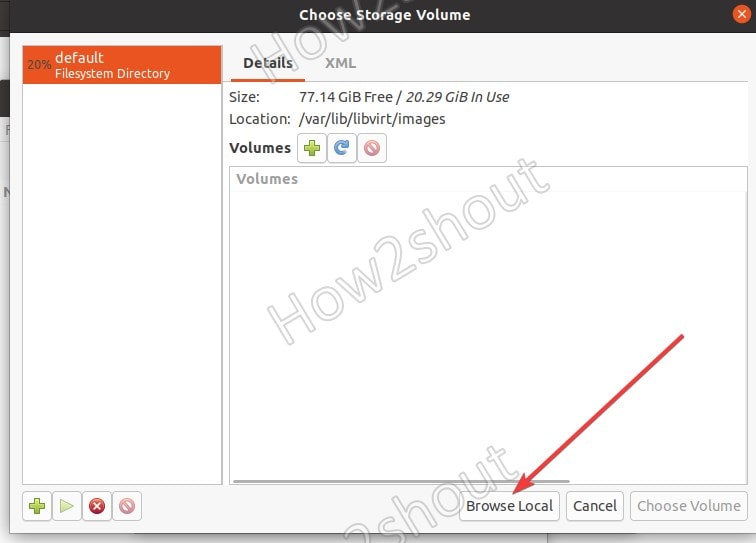
5. Browse the ISO file
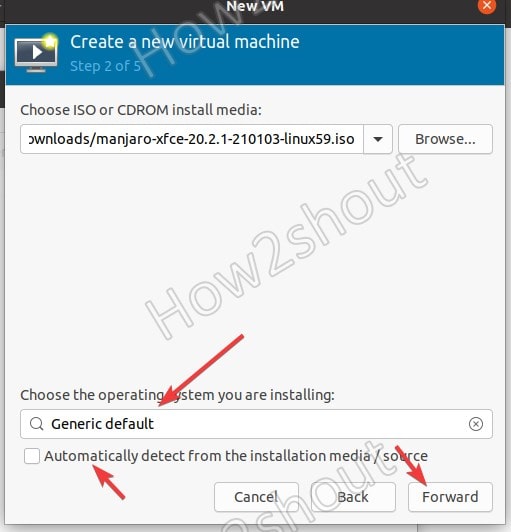
Now, click on the Browse Local button and select the ISO of the Linux or Windows operating system you want to set up for VM.
After the ISO selection, uncheck “Automatically detect from the installation media /source” because in some cases it won’t identify what type of OS we are about to install. Thus, uncheck it and search to select that manually.
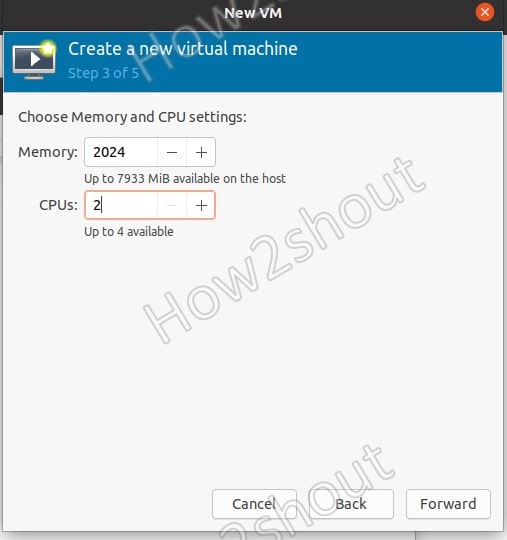
6. Choose Memory and CPU settings
Here in this step, we select the amount of RAM and number of CPU cores we want to assign for our virtual machine on KVM.
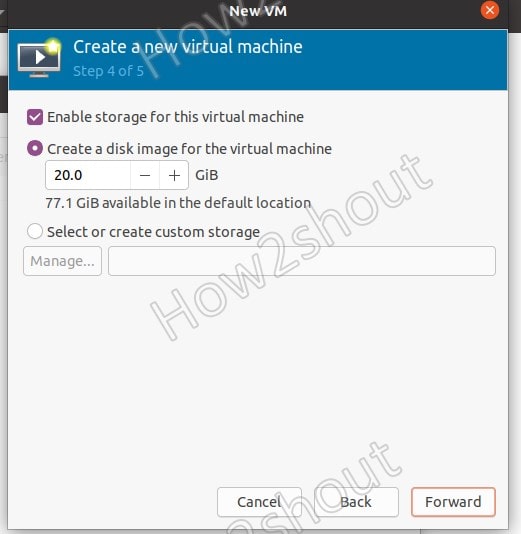
7. Create a disk image for the KVM virtual machine
To store data of VM, create a disk image or virtual hard disk. By default, it would be 20 GB, but we can increase it as per the requirement of the operating system we are about to install.
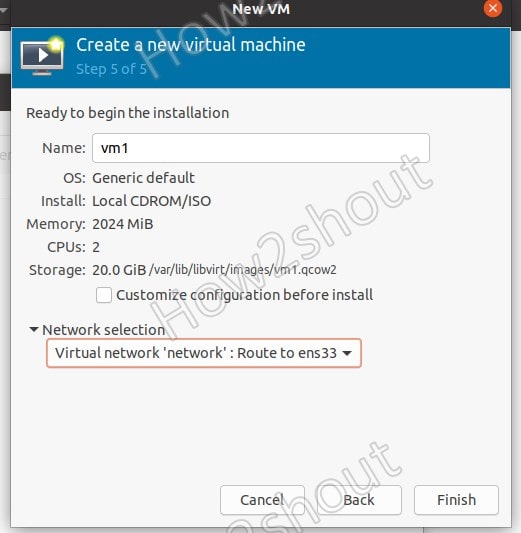
8. Select Network
The default virtual network for KVM’s VM will be in bridge mode. Thus, leave it as it is unless you want something particular in terms of routing network data.
9. Virtual Machine Interface on QEMU/KVM
Once all the above steps are done, the VM will start and you have the access to its interface for further installation of OS.
Other Articles:
- Download and install CentOS 7 Server Minimal ISO on PC or Virtualbox
- How to additional hard disk in VMware Linux Virtual Machines



Thank you four the informative tutorial. I’d like to point out that virt-manager is being deprecated with RHEL’s web console, also known as Cockpit, being the replacement moving forward.
Having used both to a moderate extent I can say that, although cockpit is it work in progress, it would be better to invest in learning.